
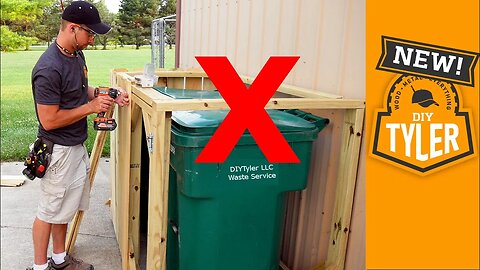
Hide your Trash! Double Trash can Blind
Everybody produces some trash and if you're anything like me you absolutely hate the colorful trash cans that ruin your beautiful backyard view. My solution was to build a hutch using pressure treated wood from the home center that would hide our two ugly green trash cans behind closed doors!
📔 Build your own! Get your plans here! https://www.diytyler.com/shop/trash-can-hutch/
👕 GET YOUR SHIRT ON, Rep the #TyNation! http://bit.ly/DITylerMERCH
This is a very simple build that will take you an afternoon to complete and will make such a huge difference in your backyard aesthetic for a long time. This trash can blind will hide two 96 gallon trash cans, if you have more than that I would not suggest making it larger as the doors will tend to drag on the ground if they are any wider.
Construction is with deck screws and you can add some bracket hardware if you want, I started with some leftover hardware but ended up not liking how wobbly the structure was so I reverted back to butt joints with deck screws. There are some 45° cuts and a few fence boards need to be ripped to a thinner size but this is quite a simple build and can be completed with only a few tools.
The frame is built with just 2x4s and the trash cans are hidden using 5 1/2" deck boards. 4 gate hinges hold the doors on and a barrel latch and gate lock hold the doors shut hiding your ugly trash cans from view. I added a few screws to hold the entire structure to the barn. While this is not necessary it does make the structure more stabilize and prevent any shifting if you crash on of the cans into the hutch while changing them out.
🎥 Subscribe http://bit.ly/2UJxXZW
📙 Check out all our other Digital Plans: http://bit.ly/2Mm6slA
🛠️ Some tools we Used (Affiliate Links):
Home Depot Discounts: homedepot.sjv.io/c/1809394/483422/8154
IsoTunes Xtra: https://amzn.to/2NBu7zw
FastCap 16oz Glue Bot: http://goo.gl/X5aNZ0
FastCap 4oz Babe Bot: http://amzn.to/1KEuIUf
Swanson Combination Square: http://goo.gl/EYuGAn
Bessey Quick Clamps: http://goo.gl/jVAzeu
FastCap Tape Measure: http://goo.gl/t2lWJD
EDC Tool Belt: http://goo.gl/XZnWRxBrayer Roller: http://goo.gl/bc5uIE
3M Respirator: https://goo.gl/ZexRQd
3M Respirator Filters: https://goo.gl/92Ejh0
Ear Plugs: https://goo.gl/R937J7
RIDGID Stealth Force Impact Driver: https://goo.gl/K2jKgG
Katz-Moses Dovetail Jig: http://bit.ly/DVTJig
Nerax Chisels: https://amzn.to/2KPVgw8
Pull Saw: https://amzn.to/31xnDoH
Coping Saw: https://amzn.to/31u3zU1
Marking Knife: https://amzn.to/2Ki5ZQv
Marking Gauge: https://amzn.to/2IIyaVp
Layout Calipers: https://amzn.to/2F6Ryuo
Diamond Sharpening Stones: https://amzn.to/2KPUC1G
12000 Grit Wetstone: https://amzn.to/31AsfKu
Flattening Stone: https://amzn.to/2Xcpdgs
Honing Strop: https://amzn.to/2KJZdlU
1/8" Chisel: https://amzn.to/2XJQML7
Titebond TiteWrap: https://amzn.to/2F9AALM
Mirka 6" ROS Sander: https://amzn.to/2Eijyfv
SuperMax 16|32 Drum Sander: https://amzn.to/2QJ3iKi
10 Million Dollar Stick: https://amzn.to/2SrKvjS
Moisture Meter: https://amzn.to/2SwBy9i
Follow us:
https://DIYTyler.com
https://www.instagram.com/diytylerg/
https://www.facebook.com/DIYTyler/
46
views

King Bed Frame | How to Build
A long time coming but we have finally finished the Wood/Metal King Bed Frame Build! The bed turned out stunning; wood grain, finish are beautiful and we built in some shelves to hold wireless phone chargers and any other random nick knacks that you might need near your bed.
Thanks to Helix Sleep for supporting this channel and keeping the videos free for you guys! Check Helix out and see what kind of sleeper you are http://helixsleep.com/diytyler and while you're there get an exclusive code of up to $125 off your Helix mattress.
King Bed Downloadable PDF Plans: http://bit.ly/2ZdM9cc
Subscribe to the Channel: http://bit.ly/2UJxXZW
GET YOUR SHIRT ON! http://bit.ly/DITylerMERCH
Digital Plans: http://bit.ly/2Mm6slA
Some tools we Use (Affiliate Links):
RIDGID Trim Router: https://goo.gl/j536AU
Tool Belt: http://goo.gl/XZnWRx
Glue Bot: http://goo.gl/X5aNZ0
IsoTunes Xtra: https://amzn.to/2NBu7zw
RevMarkers: https://goo.gl/UJZfnq
Fuji Q5 5 Stage Turbine Spray System: https://goo.gl/ZAJF5g
Bessey K Body Clamp Kit:P https://amzn.to/2SxQNhX
Brayer Roller: http://goo.gl/bc5uIE
3M Respirator: https://goo.gl/ZexRQd
3M Respirator Filters: https://goo.gl/92Ejh0
Katz-Moses Dovetail Jig: http://bit.ly/DVTJig
Nerax Chisels: https://amzn.to/2KPVgw8
Pull Saw: https://amzn.to/31xnDoH
Coping Saw: https://amzn.to/31u3zU1
Marking Knife: https://amzn.to/2Ki5ZQv
Marking Gauge: https://amzn.to/2IIyaVp
Layout Calipers: https://amzn.to/2F6Ryuo
Diamond Sharpening Stones: https://amzn.to/2KPUC1G
12000 Grit Wetstone: https://amzn.to/31AsfKu
Flattening Stone: https://amzn.to/2Xcpdgs
Honing Strop: https://amzn.to/2KJZdlU
1/8" Chisel: https://amzn.to/2XJQML7
Titebond TiteWrap: https://amzn.to/2F9AALM
Mirka 6" ROS Sander: https://amzn.to/2Eijyfv
SuperMax 16|32 Drum Sander: https://amzn.to/2QJ3iKi
10 Million Dollar Stick: https://amzn.to/2SrKvjS
Moisture Meter: https://amzn.to/2SwBy9i
Follow us:
https://DIYTyler.com
https://www.instagram.com/diytylerg/
https://www.facebook.com/DIYTyler/
#helixmattress #kingbedframe #makeakingsizebed
TheWife and I have been wanting to upgrade to a king mattress for quite some time and with our old mattress starting to cause us some morning discomforts it was time to make a change! When I sat down to design the bed we new we wanted something elegant and sturdy as a rock so I decided to incorporate some metal into the project!
The wood for the bed is Cherry, with a few pieces of pine for the support underneath, that is milled down to 1 1/8" thickness. The hardware is all custom made from 1/4" flat stock and some 2" angle, all very easy to do but if you don't have the tools this will be a very cheap project to have made down at a local fab shop.
3
views

What the Helix? Helical Cutter Head really Worth It?(TOTALLY!)
Is an upgrade to a helical cutter head on your planer really worth the money? Short story is ABSOLUTELY, you will notice immediate improvements in audible levels, chip size and amazing finish quality.
BIG thanks to http://www.MyWoodCutters.com for sponsoring this video, be sure to check them out if you want to upgrade your planer/jointer or even if you just need new or custom blades...they have it all!
Long story for a planer or jointer upgrade to a helix head is really dependent on things like what you do with your planer/jointer, what woods you typically work with and what kind of knives you already use. All that said it different for everyone and the decision is really up to you, in this video I hope to make that decision easier for you by present data that I think is important.
In this video I run several different species of wood though my planer with it's original straight knives, check the audible level, current draw, chip size and finish quality. I than change out the portable planer cutter head and put in the new shelix head, made by Byrd tool, from MyWoodCutters.com. I breeze over the head change as this is not a video showing you how to change out the planer head, there are instructions on over at MyWoodCutters.com for most machines and I have taken pictures so that Steffen and I can update the RIDGID planer instructions to be very detailed.
Once the cutterhead had been changed over to the shelix head, a relatively easy process, I ran the same boards though and collected the same data so that I could compare it for you guys.
I summary:
*The audible level is WAY, WAY down compared to the straight blades...it's incredible how different it is.
*Chip size is much smaller, no long gangly strips to jam up your dust collection system.
*Current level is up with the helical head. Was a bit worried about the machine popping breakers with the higher current draw but I have not had any issues yet and I have ran it pretty hard with lots of cherry recently.
* Finish quality of the milled wood is AMAZINGLY different. Not even in the same category. It is almost as if you have already ran a card scraper over your material. This will really cut down on a lot of sanding time.
👕👕👕👕👕👕👕👕👕👕👕👕👕👕👕👕👕👕👕👕👕👕👕👕👕👕👕👕👕👕👕👕👕
Get your Shirt on! We finally have some of our own branded shirts and hats and they are great! Get yours today and me sure to send me a pic so I can see this stuff in the wild!
www.DIYTyler.com/Merch
🔨🔨🔨🔨🔨🔨🔨🔨🔨🔨🔨🔨🔨🔨🔨🔨🔨🔨🔨🔨🔨🔨🔨🔨🔨🔨🔨🔨🔨🔨
Some tools I used (affiliate links):
Katz-Moses Dovetail Jig: http://bit.ly/DVTJig
Nerax Chisels: https://amzn.to/2KPVgw8
Pull Saw: https://amzn.to/31xnDoH
Coping Saw: https://amzn.to/31u3zU1
Marking Knife: https://amzn.to/2Ki5ZQv
Marking Gauge: https://amzn.to/2IIyaVp
Layout Calipers: https://amzn.to/2F6Ryuo
Diamond Sharpening Stones: https://amzn.to/2KPUC1G
12000 Grit Wetstone: https://amzn.to/31AsfKu
Flattening Stone: https://amzn.to/2Xcpdgs
Honing Stop: https://amzn.to/2KJZdlU
Glue Bot: http://goo.gl/X5aNZ0
1/8" Chisel: https://amzn.to/2XJQML7
Titebond TiteWrap: https://amzn.to/2F9AALM
Tool Belt: http://goo.gl/XZnWRx
IsoTunes Xtra: https://amzn.to/2NBu7zw
Mirka 6" ROS Sander: https://amzn.to/2Eijyfv
SuperMax 16|32 Drum Sander: https://amzn.to/2QJ3iKi
10 Million Dollar Stick: https://amzn.to/2SrKvjS
Moisture Meter: https://amzn.to/2SwBy9i
Mirka 6" ROS Sander: https://amzn.to/2Eijyfv
14
views

How to Make a DIY Planter
How to build a OutDoor Planter Box for only $31 that will add that final touch to your patio or deck! This is a SUPER simple DIY project that can be completed in an hour or so and can be shown off to your friends for years!
Big thanks to Greenworks for sponsoring this video. They are a big reason our lawn (which I am very proud of looks so sharp!) Check them out!
http://bit.ly/GreenworksTG
NEW MERCH!! Some of you have been asking for years if I had shirts or hats for sale, we finally do! Check them out and until JULY 31, 2019 using the code HATCOMBO (make sure it's all caps) you can get a shirt of your choice and hat for a discounted price!
http://bit.ly/DITylerMERCH
FREE Plans to build your own planter! https://www.diytyler.com/shop/planter/
Instagram: https://www.instagram.com/diytylerg/
Website: https://www.diytyler.com/
Facebook: https://www.facebook.com/DIYTyler/
Some Tools I Use (affiliate links):
Cordless Sprayer: https://amzn.to/2jFze3L
Tool Belt: http://goo.gl/XZnWRx
IsoTunes Xtra: https://amzn.to/2NBu7zw
Workboots: https://amzn.to/2X3x8bG
18g Brad Nails: https://amzn.to/2jEmpGZ
TiteBond III: https://amzn.to/32thFWv
Nerax Chisels: https://amzn.to/2KPVgw8
Pull Saw: https://amzn.to/31xnDoH
Coping Saw: https://amzn.to/31u3zU1
Marking Knife: https://amzn.to/2Ki5ZQv
Marking Gauge: https://amzn.to/2IIyaVp
Layout Calipers: https://amzn.to/2F6Ryuo
Diamond Sharpening Stones: https://amzn.to/2KPUC1G
12000 Grit Wetstone: https://amzn.to/31AsfKu
Flattening Stone: https://amzn.to/2Xcpdgs
Honing Stop: https://amzn.to/2KJZdlU
Glue Bot: http://goo.gl/X5aNZ0
1/8" Chisel: https://amzn.to/2XJQML7
Titebond TiteWrap: https://amzn.to/2F9AALM
Mirka 6" ROS Sander: https://amzn.to/2Eijyfv
SuperMax 16|32 Drum Sander: https://amzn.to/2QJ3iKi
10 Million Dollar Stick: https://amzn.to/2SrKvjS
Moisture Meter: https://amzn.to/2SwBy9i
7
views
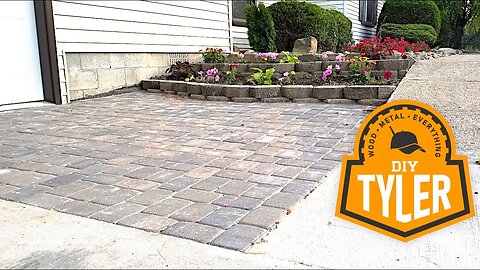
How to Lay a Paver Patio (Like a Pro!)
Thanks to Nite Ize for sponsoring this video, check out some of their innovative products https://www.niteize.com/ A few of my favorites are the Gear Ties and Rechargeable Headlamp!
Obviously this is not woodworking but it is DIY and Home Improvement! If you miss woodworking maybe one of these will be your fix!
https://www.youtube.com/playlist?list=PLsk0VxaVqgZHUdH0TKPNG5uNaXyG0eTcS
👕👕👕👕👕👕👕👕👕👕👕👕👕👕👕👕👕👕👕👕👕👕👕👕👕👕👕👕👕👕👕
Get your Shirt on!! http://bit.ly/DITylerMERCH
👕👕👕👕👕👕👕👕👕👕👕👕👕👕👕👕👕👕👕👕👕👕👕👕👕👕👕👕👕👕👕
It was always part of the big plan to finish the landscaping in front of the new addition as soon as it got warm, well it took FOREVER to get warm and dry up but the time has finally come! In this video I will share my process for laying pavers like a pro! I have laid a LOT of pavers in my time and 15 years later they are still looking great even with our harsh Michigan winters.
It all starts with the base and to get a proper 4-8 inches of 21AA crush limestone or concrete we had to dig out a fair amount of dirt in the patio area. This worked out well as we also had to connect a gutter downspout to a drain pipe that needed to be found again. All fairly easy work as I had grabbed by dads backhoe tractor to help with the digging, it made quite work of everything! Once we had the area dug out to the level we needed I laid down black landscape fabric to prevent the mud from eating all the gravel that we are about to put down. You want to make sure you have fabric that will allow water to flow though so don't use a plastic underlayment.
Used my truck to get the 21AA and was surprised how heavy the stuff is, was only able to get a half a yard at a time! Lucky I picked up an unloader that made easy work of dumping the gravel off the truck bed, some of the best money I have spent! Once the gravel was in place and spread out to a surface that we were after it was time for some serious time with the hand compactor. Another great tip is to give the surface a good soak with a hose, this will really help compact the area. After the 21AA is set it is a good idea to add some compacting sand or paver sand to make sure you don't have any bigger gravel rocks preventing a smooth surface.
Now it's time for paves! With my helpers we moved everything in place and went to town with an easy and repeatable pattern. Nothing special here, just make sure that you hold straight lines and check back with every few rows to make sure you don't stray. Angles can be easily cut with a tile saw or a concrete saw. Once the pavers are all set go back over with the compactor to make sure everything is smooth. After the first run with the compactor add some play sand over the pavers and sweep the sand into the cracks of the pavers, then go back over with the compactor and back over with the sand....you will need to do the process a few times to make sure you have the pavers set well.
Tools I Use (affiliate links):
Tool Belt: http://goo.gl/XZnWRx
IsoTunes Xtra: https://amzn.to/2NBu7zw
Hand Compactor: https://amzn.to/2JeZXgk
Workboots: https://amzn.to/2X3x8bG
Nerax Chisels: https://amzn.to/2KPVgw8
Pull Saw: https://amzn.to/31xnDoH
Coping Saw: https://amzn.to/31u3zU1
Marking Knife: https://amzn.to/2Ki5ZQv
Marking Gauge: https://amzn.to/2IIyaVp
Layout Calipers: https://amzn.to/2F6Ryuo
Diamond Sharpening Stones: https://amzn.to/2KPUC1G
12000 Grit Wetstone: https://amzn.to/31AsfKu
Flattening Stone: https://amzn.to/2Xcpdgs
Honing Stop: https://amzn.to/2KJZdlU
Glue Bot: http://goo.gl/X5aNZ0
1/8" Chisel: https://amzn.to/2XJQML7
Titebond TiteWrap: https://amzn.to/2F9AALM
Mirka 6" ROS Sander: https://amzn.to/2Eijyfv
SuperMax 16|32 Drum Sander: https://amzn.to/2QJ3iKi
10 Million Dollar Stick: https://amzn.to/2SrKvjS
Moisture Meter: https://amzn.to/2SwBy9i
102
views
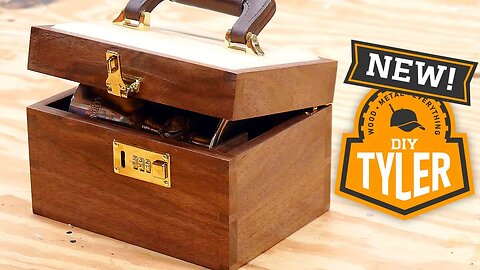
A Beautiful Treasure (Pure Woodworking/No Talking)
6/21/19 Jonah Garno. Priest. My best friend, the best man in my wedding, someone that was there when I needed a friend to listen and chat the most, is now a priest and it is a special day.
Jonah asked me if I would like to make a box to hold his chalice and I jumped at the opportunity. He is an artist so I knew it needed to be something beautiful and special yet simply elegant enough to match his stunning chalice.
I decided to go with walnut wood as it's, in my opinion, one of the most beautiful woods there is and it is very easy to work with. The top and bottom will be ash to accent the walnut and provide some dimension to the project. I milled the walnut from some rough stock down to just over 3/8" and let it sit to get any last bit of moisture from the wood. After the stock had settled to around 8% moisture content I ran it through the drum sander to bring it down to the final dimension of 3/8".
The joint of choice is is dovetails and I will be cutting these by hand using the Katz-Moses dovetail jig. (Link to that below.) I took my time cutting these dovetails as it was the very first box I have ever hand cut and it is obviously a special project.
I couldn't have been more pleased with the results of the joinery and the chamfered ash top is a great finishing touch. There are a few other odds and ends in the box to hold some accompanying hardware but they were easy items to add and are held it with dadoes and wood glue.
The box has a brass combination lock to keep Jonah's chalice safe and it also sports brass mortised hinges that hold the box open at 100° instead of flopping all the way to the table top.
Congrats Jonah, I hope this box last you a long time!
🛠️🛠️🛠️🛠️🛠️🛠️🛠️🛠️🛠️🛠️🛠️🛠️🛠️🛠️🛠️🛠️🛠️🛠️🛠️🛠️🛠️🛠️🛠️🛠️🛠️🛠️🛠️🛠️🛠️🛠️🛠️
Some tools I used (affiliate links):
Katz-Moses Dovetail Jig: http://bit.ly/DVTJig
Nerax Chisels: https://amzn.to/2KPVgw8
Pull Saw: https://amzn.to/31xnDoH
Coping Saw: https://amzn.to/31u3zU1
Marking Knife: https://amzn.to/2Ki5ZQv
Marking Gauge: https://amzn.to/2IIyaVp
Layout Calipers: https://amzn.to/2F6Ryuo
Diamond Sharpening Stones: https://amzn.to/2KPUC1G
12000 Grit Wetstone: https://amzn.to/31AsfKu
Flattening Stone: https://amzn.to/2Xcpdgs
Honing Stop: https://amzn.to/2KJZdlU
Glue Bot: http://goo.gl/X5aNZ0
1/8" Chisel: https://amzn.to/2XJQML7
Titebond TiteWrap: https://amzn.to/2F9AALM
Tool Belt: http://goo.gl/XZnWRx
IsoTunes Xtra: https://amzn.to/2NBu7zw
Mirka 6" ROS Sander: https://amzn.to/2Eijyfv
SuperMax 16|32 Drum Sander: https://amzn.to/2QJ3iKi
10 Million Dollar Stick: https://amzn.to/2SrKvjS
Moisture Meter: https://amzn.to/2SwBy9i
Mirka 6" ROS Sander: https://amzn.to/2Eijyfv
14
views
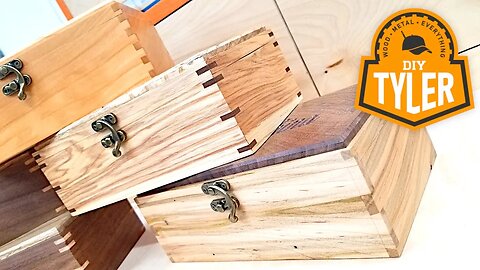
MAGIC of Joinery | 3 Similar Boxes with 3 Unique Woodworking Joints
Click https://skl.sh/tylerg get 2 months of Skillshare for FREE.
Being the woodworker, maker...whatever you want to call me....that I am, it is in NO way appropriate that my kids are going to school with plastic pencil boxes, they need some SWEET wood ones! In this video I share with you the magic of woodworking joinery and build three pencil boxes that function and have the same exact form factor but are made using completely different joinery methods.
Other fine wood woodworking projects: https://www.youtube.com/playlist?list=PLsk0VxaVqgZFbTVNCy3AbBHSzLWnNIZ97
I actually made 5 boxes but didn't want the video to get too out of hand so I only show off three different woodworking joints. One joint, used for three boxes, is miters with splines for reinforcements, one box with box or finger joints, and one box with hand-cut dovetails. To make things pop each of these boxes was made with a different combination of wood species.
Started by milling all the wood from rough stock down to the 3/8 and 1/4" materials that I needed for the boxes. Used a combination of the jointer, bandsaw, planer, miter saw and table saw to break down all the materials. That moved on to each of the joinery methods starting with the miters, then box joints and lastly the hand-cut doevetails. Was really pleased with the results of all the different joints. Being the second time I have made a project with dovetails I must say they came out pretty well!
All the boxes were finished with a few coats of rattle can spray lacquer and rustic bronze hinges and locks added for a finishing touch.
🛠️🛠️🛠️🛠️🛠️🛠️🛠️🛠️🛠️🛠️🛠️🛠️🛠️🛠️🛠️🛠️🛠️🛠️🛠️🛠️🛠️🛠️🛠️🛠️🛠️🛠️🛠️🛠️🛠️🛠️🛠️
Some tools I used (affiliate links):
Katz-Moses Dovetail Jig: http://bit.ly/DVTJig
Nerax Chisels: https://amzn.to/2KPVgw8
Pull Saw: https://amzn.to/31xnDoH
Coping Saw: https://amzn.to/31u3zU1
Marking Knife: https://amzn.to/2Ki5ZQv
Marking Gauge: https://amzn.to/2IIyaVp
Layout Calipers: https://amzn.to/2F6Ryuo
Diamond Sharpening Stones: https://amzn.to/2KPUC1G
12000 Grit Wetstone: https://amzn.to/31AsfKu
Flattening Stone: https://amzn.to/2Xcpdgs
Honing Stop: https://amzn.to/2KJZdlU
Glue Bot: http://goo.gl/X5aNZ0
1/8" Chisel: https://amzn.to/2XJQML7
Titebond TiteWrap: https://amzn.to/2F9AALM
Tool Belt: http://goo.gl/XZnWRx
IsoTunes Xtra: https://amzn.to/2NBu7zw
Mirka 6" ROS Sander: https://amzn.to/2Eijyfv
SuperMax 16|32 Drum Sander: https://amzn.to/2QJ3iKi
10 Million Dollar Stick: https://amzn.to/2SrKvjS
Moisture Meter: https://amzn.to/2SwBy9i
Mirka 6" ROS Sander: https://amzn.to/2Eijyfv
40
views

Turning an Attic into a Playroom with a GIANT Chalkboard!
When we moved out of our old house we knew we were loosing a basement for the kids to play in during the long Michigan winters. Today we will be turning part of the new attic into a playroom and the icing on the cake is a FULL WALL Chalkboard!
👢👢👢👢👢👢👢👢👢👢👢👢👢👢👢👢👢👢👢👢👢👢👢👢👢👢👢👢
This video was brought to us by Carolina Shoe: http://bit.ly/2wi9CNe
Use Promo Code: DIYTylerAttic for 10% off a pair of Carolina boots.
Code expires 06/30/2019
FYI, my favorite pair of Carolina's are the 28s. Also, Carolina asked me to answer some interview questions, check that out here if you're interested...it turned out really well!
https://www.youtube.com/watch?v=F46K-w4JhpY
👢👢👢👢👢👢👢👢👢👢👢👢👢👢👢👢👢👢👢👢👢👢👢👢👢👢👢👢👢
If you have not see the other addition videos you can get up to speed to see where we are at!
It was always part of the plan when we bought this house to build an addition and include a big attached garage with a huge attic that we would turn into a "basement". The time has finally come to complete the attic to playroom transformation!
https://www.youtube.com/playlist?list=PLsk0VxaVqgZEG4H3IPW4rh0j3P_Z5b4OL
The new playroom space is at the top of the garage stairs and is roughly 13'x20' making it a pretty large room! The walls are 2x4 construction and I had to do a little trigonometry to correctly calculate the stud lengths to fit under the angled attic trusses.
Since we had to build the attic with 19" centers to allow the largest room we could I had to cut down all the 24" R30 rockwool insulation to fit between the trusses. A pain to say the least but I made a quick jig to allow me to stand on the batt, compress it and cut it with a 6" knife without too much difficulty. For the walls we used R15 insulation and this went in MUCH easier since I build the new walls to 16" centers.
My brother and I hung the sheetrock, 1/2" on the walls and 5/8" on the ceiling and man does a collated drill make this task SO much easier! You might ask why we hung the walls and then the ceiling vs the more typical method and it boiled down to the way we brought the material into the attic and not wanting to shuffle it all around again...it is a playroom after all, not a cathedral. I did a VERY un DIYTyler act and hired out the mud work, professional sheetrockers are SO much faster and better than I am and I simply didin't have the time to mess with it this time around.
Painted the room using my Grago airless sprayer, again, there is not better way to put a finish on anything than spraying! Fast and if I do say so, kinda fun! For one wall we used Rusloeum chalkboard paint so the kids would have a GIANT chalkboard to write, color and draw on....so far it's a big hit!
Added some door and lights and the kids have been thoughouly enjoying their new space! A dry, comfortable and functional room where they can exert their energy when they cannot go outside. A great way to turn an ugly attic into a usable fun space!
🛠️🛠️🛠️🛠️🛠️🛠️🛠️🛠️🛠️🛠️🛠️🛠️🛠️🛠️🛠️🛠️🛠️🛠️🛠️🛠️🛠️🛠️🛠️🛠️🛠️
Some Tools I used (Affiliate Links):
IsoTunes Xtra: https://amzn.to/2NBu7zw
RIDGID Cordless Collated Drill: https://thd.co/2YRvZp3
FastCap 16oz Glue Bot: http://goo.gl/X5aNZ0
EDC Tool Belt: http://goo.gl/XZnWRx
RIDGID 18V Cordless JobMax: https://goo.gl/pvEMmf
RIDGID Cordless Nailer: https://goo.gl/hFfGQw
Moisture Meter: https://amzn.to/2SwBy9i
RevMarkers: https://goo.gl/UJZfnq
Mirka 6" ROS Sander: https://amzn.to/2Eijyfv
Fuji Q5 5 Stage Turbine Spray System: https://goo.gl/ZAJF5g
RIDGID Stealth Force Impact Driver: https://goo.gl/K2jKgG
RIGID Cordless MiterSaw: https://goo.gl/JLaIij
Rockler Router Table: http://bit.ly/2G2vIed
Rockler Router Dust Shroud: http://bit.ly/2Ssdg02
SuperMax 16|32 Drum Sander: https://amzn.to/2QJ3iKi
10 Million Dollar Stick: https://amzn.to/2SrKvjS
#attic #playroom #attictransformation
58
views
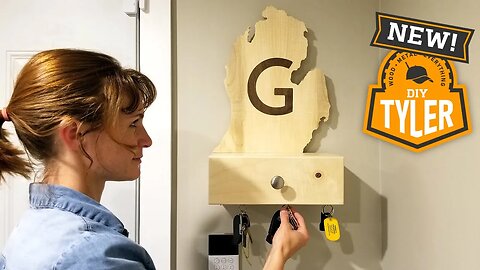
Michigan Key Shelf
Now that the addition is done our car, tractor and other keys were being stored quite a ways away from the door that we use everyday. Changed that by making a car key shelf, with a drawer for miscellaneous items, that is hung under a (mural?) of the Michigan lower peninsula, aka. Michigan Mitten, with a walnut monogram G for the first letter of our last name.
Learn more about the Inventables X-Carve or try Easel and experiment or design for free!
Easel: http://bit.ly/2VW4kW7
X-Carve: http://bit.ly/2E0lnfB
Playlist of all the addition related videos:
https://www.youtube.com/playlist?list=PLsk0VxaVqgZEG4H3IPW4rh0j3P_Z5b4OL
Woodworking videos:
https://www.youtube.com/playlist?list=PLsk0VxaVqgZHUdH0TKPNG5uNaXyG0eTcS
This project was completed mostly from some dimension maple with a touch of black walnut for the monogram inlay. I began the process, like most of my projects, at the miter saw. It seems like all my projects start at the miter saw but when I actually stop and think about it the actual step is breaking larger material down into more manageable pieces, my tool of choice for that is the miter saw. For others it could be a circular saw, jig saw or even a sawzall.
Once my pieces were not 8 feet long anymore I moved over to the bandsaw where I resawed the boards to maximize the yield from the wood that I was using. After resawing was complete and because the boards were pretty flat to begin with I skipped over the typical step of jointing and moved right to the planer to get things flat and parallel.
I then glued up a panel for the mitten and found a usable .sgv file to import into Easel to make the cut on the CNC machine. I also used the built in app in Easel (which is a free program BTW) to create in inlay cut for the monogram G.
All the parts for the shelf and drawer were cut on the table saw and box joints were cut using the John Heisz design box joint jig I made a few years ago.
Video for that build: https://youtu.be/_Ll5wp5OvUo
John's Plans (very easy to follow): https://ibuildit.ca/plans/ultimate-box-joint-jig/
Glued up all the parts and sanded everything with 120 up to 220grit. Finished with General Finishes EnduroVar sprayed with an HVLP sprayer.
Some tools I use (affiliate links):
Rocker Glue Applicator Set: https://amzn.to/2NRu8uV
FastCap 16oz Glue Bot: http://goo.gl/X5aNZ0
FastCap Tape Measure: http://goo.gl/t2lWJD
EDC Belt Carry: http://goo.gl/XZnWRx
Mirka 6" ROS Sander: https://goo.gl/Dp85kf
Fuji Q5 5 Stage Turbine Spray System: https://goo.gl/ZAJF5g
3M Respirator: https://goo.gl/ZexRQd
3M Respirator Filters: https://goo.gl/92Ejh0
Ear Plugs: https://goo.gl/R937J7
RIDGID Stealth Force Impact Driver: https://goo.gl/K2jKgG
RIDGID Spindle Sander: https://goo.gl/NURw0c
RIDGID Cordless Trim Router: https://goo.gl/3jxBaz
IsoTunes Xtra: https://amzn.to/2NBu7zw
FastCap 16oz Glue Bot: http://goo.gl/X5aNZ0
Mirka 6" ROS Sander: https://amzn.to/2Eijyfv
Fuji Q5 5 Stage Turbine Spray System: https://goo.gl/ZAJF5g
3M Respirator: https://goo.gl/ZexRQd
3M Respirator Filters: https://goo.gl/92Ejh0
RIDGID Cordless Nailer: https://goo.gl/hFfGQw
RIDGID Cordless Trim Router: https://goo.gl/3jxBaz
#keyholder #keyrack #MIMural?
49
views
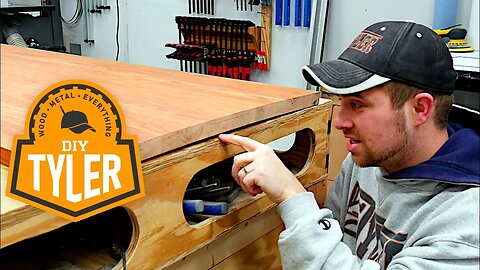
This is BAD! Better to Cut then Flatten or Flatten then Cut?? | Flatten Large Slab/Wood
With all the milling I have been doing recently I have been asked several times if it is better to Cut then Flatten or Flatten and then cut your lumber. Had a guy at work ask me to flatten a tabletop for him and this is a great opportunity to show my thoughts behind the question!
I am of the opinion that it is better to cut your stock or slabs to a dimension close to what you will be needing because it will likely GREATLY reduce the amount of wood that you will have to remove. This table top was a great example. If you could even find a jointer wide enough you would have lost almost 3/8" of the thickness of the table. By cutting it and taking out much of the warp before even hitting the jointer I was able to fix the table by removing only 1/8" of an inch.
You know we have a website with all sorts of awesome plans. Support the channel and build some great stuff!
http://www.diytyler.com/product-category/plans/
Like what you see, here are some more great videos:
https://www.youtube.com/playlist?list=PLsk0VxaVqgZHUdH0TKPNG5uNaXyG0eTcS
Some tools I use (affiliate links):
Rockler 1/2" Doweling Jig: https://amzn.to/2OofVXx
Rocker Glue Applicator Set: https://amzn.to/2NRu8uV
FastCap 16oz Glue Bot: http://goo.gl/X5aNZ0
FastCap Tape Measure: http://goo.gl/t2lWJD
EDC Belt Carry: http://goo.gl/XZnWRx
Mirka 6" ROS Sander: https://goo.gl/Dp85kf
Fuji Q5 5 Stage Turbine Spray System: https://goo.gl/ZAJF5g
3M Respirator: https://goo.gl/ZexRQd
3M Respirator Filters: https://goo.gl/92Ejh0
Ear Plugs: https://goo.gl/R937J7
RIDGID Stealth Force Impact Driver: https://goo.gl/K2jKgG
RIDGID Spindle Sander: https://goo.gl/NURw0c
RIDGID Cordless Trim Router: https://goo.gl/3jxBaz
IsoTunes Xtra: https://amzn.to/2NBu7zw
FastCap 16oz Glue Bot: http://goo.gl/X5aNZ0
Mirka 6" ROS Sander: https://amzn.to/2Eijyfv
Fuji Q5 5 Stage Turbine Spray System: https://goo.gl/ZAJF5g
3M Respirator: https://goo.gl/ZexRQd
3M Respirator Filters: https://goo.gl/92Ejh0
RIDGID Cordless Nailer: https://goo.gl/hFfGQw
RIDGID Cordless Trim Router: https://goo.gl/3jxBaz
#flattening #milling #flatten
41
views

DIY Laundry Basket Shelf | 6 Baskets in 18" of Space!!
You probably know that we recently added a laundry room to our house, today we make it amazing by adding a DIY Laundry Basket Shelf that holds 6 baskets in just 18 inches of space!
All addition videos: https://www.youtube.com/playlist?list=PLsk0VxaVqgZEG4H3IPW4rh0j3P_Z5b4OL
Stacking Laundry Basket Shelf Article and Plans: https://www.diytyler.com/shop/laundry-basket-shelf/
If you have been following along our recent home updates, you will see we have been busy putting an addition on our home, which included a laundry room for Every Launderers' dream. The epic reveal came out, and we breezed over one neat concept in the build that we would like to share with you today. The stacking laundry basket shelf! It's been such a neat organizational tool and perfect for the smallest of laundry rooms to those generous in size. It only takes up 18 inches of space! Also, unless your family is well above average size, this 6 basket shelf should be more than adequate to sort several days or a weeks' worth of clothes. Behold! The stacking laundry basket shelf!
The shelf is made with 2 sheets of 3/4" plywood and assembled with wood glue, brad nails and pocket screws. I chose to finish mine with Sherwin Williams kem aqua + lacquer in a dover white color.
If you're still here and you noticed the new logo and colors lemme know what you think! If you don't like it....don't let me know!
🛠️🛠️🛠️🛠️🛠️🛠️🛠️🛠️🛠️🛠️🛠️🛠️🛠️🛠️🛠️🛠️🛠️🛠️🛠️🛠️🛠️🛠️🛠️🛠️🛠️🛠️🛠️🛠️🛠️🛠️
Some Tools and Supplies (affiliate links):
Laundry baskets: https://amzn.to/2X5eRLq
Wood Glue: https://amzn.to/2IfgAL2
Pocket screws: https://amzn.to/2IkVw5V
Tool Belt I always wear: http://goo.gl/XZnWRx
IsoTunes Xtra: https://amzn.to/2NBu7zw
FastCap 16oz Glue Bot: http://goo.gl/X5aNZ0
Mirka 6" ROS Sander: https://amzn.to/2Eijyfv
Fuji Q5 5 Stage Turbine Spray System: https://goo.gl/ZAJF5g
3M Respirator: https://goo.gl/ZexRQd
3M Respirator Filters: https://goo.gl/92Ejh0
RIDGID Cordless Nailer: https://goo.gl/hFfGQw
RIDGID Cordless Trim Router: https://goo.gl/3jxBaz
#laundrysorter #plywoodproject #laundry
22
views

Add a Railing for a Staircase
As much as our kids like sliding down the wall cap, today we are going to Build a Stair Railing in our cape cod house!
Check out the web article: http://www.diytyler.com/2019/03/29/build-a-stair-railing-for-a-half-wall/
More projects and videos! https://www.youtube.com/watch?v=snrKS2ucGBk&list=PLsk0VxaVqgZHUdH0TKPNG5uNaXyG0eTcS
Newel Post plans and all sorts of other good stuff! https://www.diytyler.com/shop/newel-post/
When we bought this house a couple of years ago, the stairwell was open on one side with a half wall, nothing else. As much fun as our kids had sliding down this area, it looked incomplete and posed a safety problem for the baby now racing up the steps faster than we could chase her. There just wasn’t a good way to attach a gate. Our solution: Build a Newel Post and close in that space with a simple handrail and homemade balusters.
🛠️🛠️🛠️🛠️🛠️🛠️🛠️🛠️🛠️🛠️🛠️🛠️🛠️🛠️🛠️🛠️🛠️🛠️🛠️🛠️🛠️🛠️🛠️🛠️🛠️
Some Tools I used (Affiliate Links):
IsoTunes Xtra: https://amzn.to/2NBu7zw
FastCap 16oz Glue Bot: http://goo.gl/X5aNZ0
EDC Tool Belt: http://goo.gl/XZnWRx
RevMarkers: https://goo.gl/UJZfnq
Mirka 6" ROS Sander: https://amzn.to/2Eijyfv
Fuji Q5 5 Stage Turbine Spray System: https://goo.gl/ZAJF5g
RIDGID Stealth Force Impact Driver: https://goo.gl/K2jKgG
Rockler Router Table: http://bit.ly/2G2vIed
Rockler Router Dust Shroud: http://bit.ly/2Ssdg02
SuperMax 16|32 Drum Sander: https://amzn.to/2QJ3iKi
10 Million Dollar Stick: https://amzn.to/2SrKvjS
4
views

Make a Rustic Pallet Wood Wall Clock
The ONLY client I take orders from, the Wife, asked for a large rustic pallet wood clock for our new mudroom. Happy wife makes for a happy life so I made a GIANT DIY Pallet Wood Wall Clock! She was very happy with the results and I actually took the opportunity to make a few clocks so we can give a few away to our friends.
Kind of special that I got the pallet wood from some of the pallets that delivered supplies for the very mudroom that we will be placing this clock. If you haven't seen our series of videos where we build and finish the addition you can find that here: https://www.youtube.com/watch?v=9jPMOzMivB8&list=PLsk0VxaVqgZEG4H3IPW4rh0j3P_Z5b4OL
Not a difficult build, although working with pallet wood has never been a super easy process at least for me, but a unique item that looks awesome when you're done! I used my Inventables X-Carve to cut the clock face pattern but if you don't have a CNC you can still complete this project but you will need more patience than me! If you would like to make an Easel account, Inventables free software to draw stuff and run the X-Carve, you can find that and this Clock Project at this link:
https://www.inventables.com/projects/giant-roman-numeral-clock?ref=diytyler#instructions
🔨🔨🔨🔨🔨🔨🔨🔨🔨🔨🔨🔨🔨🔨🔨🔨🔨🔨🔨🔨🔨
Take a look at all the plans I have produced, If I can build it YOU can too!
http://www.diytyler.com/product-category/plans/
Follow on Instagram for behind the scenes action:
https://www.instagram.com/diytylerg/?hl=en
🛠️🛠️🛠️🛠️🛠️🛠️🛠️🛠️🛠️🛠️🛠️🛠️🛠️🛠️🛠️🛠️🛠️🛠️🛠️🛠️🛠️
Tools I Use (Affiliate Links):
Moisture Meter: https://amzn.to/2SwBy9i
IsoTunes Xtra: https://amzn.to/2NBu7zw
FastCap 16oz Glue Bot: http://goo.gl/X5aNZ0
EDC Tool Belt: http://goo.gl/XZnWRx
FastCap Tape Measure: http://goo.gl/t2lWJD
Mirka 6" ROS Sander: https://amzn.to/2Eijyfv
Fuji Q5 5 Stage Turbine Spray System: https://goo.gl/ZAJF5g
Bessey K Body Clamp Kit:P https://amzn.to/2SxQNhX
Brayer Roller: http://goo.gl/bc5uIE
3M Respirator: https://goo.gl/ZexRQd
SuperMax 16|32 Drum Sander: https://amzn.to/2QJ3iKi
10 Million Dollar Stick: https://amzn.to/2SrKvjS
Router Table Base: https://amzn.to/2TFqtI1
Router Lift: https://amzn.to/2XWxaUl
#palletwood #rusticclock #wallclock
33
views

We Built an Addition! Plus 5 Tips to save $1000s when building a house!
SimpliSafe is awesome security. It's really effective, it's really easy to use, and the price is great. Check SimpliSafe out here: https://simplisafe.com/DIYTyler
We built an addition! In this video we share our house addition tour and share 5 tips to save thousands when adding on. (No joke, save tons of money!)
Playlist for all the videos produced for this addition build:
https://www.youtube.com/playlist?list=PLsk0VxaVqgZEG4H3IPW4rh0j3P_Z5b4OL
When we bought this house we knew we were losing two things when we made the move, we were losing an attached garage and we were losing a large basement. We bought this house with the intention that we would add on at some point, we have now completed phase 1 of that process!
We added a large garage, that has garage doors on the front and the back so I can drive right though to the shop if I have a load of material or have to deliver a product I made. We also added a large attic space over that garage for additional storage AND we will soon build a insulated playroom in the space for the kids, thus replacing the basement that we lost. Lastly we added a mudroom, epic laundry room and an additional bathroom.
💰💰💰💰💰💰💰💰💰💰💰💰💰💰💰💰💰💰💰💰💰💰💰💰💰
Tips for saving your money:
1) Be your own General Contractor (GC). Will save you 25/30% right off the bat. This cost is a price that you are paying for the general contractor to find or bring in his own trades, and for his insurance.
2) Try and find a Amish source for building material. We are lucky enough to live in an area where we are only about an hour away from several Amish communities (we are not Amish) and were able to get our trusses and lumber from them for a great price. They were actually able to build us attic trusses with a larger attic room compared to other suppliers. AND they were able to get us all the supplies in about two weeks from order. THAT IS FAST.
3) Be your own labor. You're free and already paying the "rent" at the house so you might as well put yourself to use! Don't be afraid to jump in a lend a hand, this way you can learn and you can save your self some money with your free labor.
4) Lay your own floors. Laying floor isn't hard, just time consuming. Hardwood is a piece of cake, anyone can do it with very minimal tools. Tile is a bit harder but again mostly just time consuming. Watch some videos and learn how to do it yourself!
5) Make your own trim. Trim from the big box stores cost an unbelievable amount of money and are absolute rubbish for the most part. Making your own trim, even if you use lumber from the box store, will save you a ton. If you can source better wood from a local yard you will be even better off.
🔨🔨🔨🔨🔨🔨🔨🔨🔨🔨🔨🔨🔨🔨🔨🔨🔨🔨🔨🔨🔨
Video Index:
Laundry Room Cabinets: https://youtu.be/9jPMOzMivB8
Shaker Style Cabinet Doors: https://youtu.be/dfXcyx9vQJI
Stacking Laundry Basket Shelf: Coming soon!
Mudroom Lockers: https://youtu.be/eZwqD_TDEbk
Double Bathroom Vanity with Hidden Drawer Stool: Coming soon!
Installing Wood look Tile Flooring: https://youtu.be/a16MYL2U8xA
🛠️🛠️🛠️🛠️🛠️🛠️🛠️🛠️🛠️🛠️🛠️🛠️🛠️🛠️🛠️🛠️🛠️🛠️🛠️🛠️🛠️
Some Tools I Used in these builds (affiliate links):
IsoTunes Xtra: https://amzn.to/2NBu7zw
FastCap 16oz Glue Bot: http://goo.gl/X5aNZ0
FastCap Tape Measure: http://goo.gl/t2lWJD
EDC Tool Belt: http://goo.gl/XZnWRx
RevMarkers: https://goo.gl/UJZfnq
Mirka 6" ROS Sander: https://amzn.to/2Eijyfv
Fuji Q5 5 Stage Turbine Spray System: https://goo.gl/ZAJF5g
Brayer Roller: http://goo.gl/bc5uIE
3M Respirator: https://goo.gl/ZexRQd
3M Respirator Filters: https://goo.gl/92Ejh0
RIGID Cordless MiterSaw: https://goo.gl/JLaIij
RIDGID Cordless Jig Saw: https://goo.gl/uVGFcX
Full Extension Drawer Slides: https://amzn.to/2BKLzvR
#addition #newhouse #building
91
views

Laundry Room Cabinets | EPIC Room Reveal!
As many of you probably know we recently added on to our house and we finally finished the laundry room cabinets, epic laundry room reveal time!
********************************************************************
BIG thanks to Kreg tool for sponsoring this video! Check them out at https://www.kregtool.com/
********************************************************************
We manufacture a lot of laundry at our house so we wanted the laundry room to be an epic usable space that was very functional and comfortable to work in. We opted for a LOT of cabinets for storage and some beautiful HD laminate counters for folding and just looking awesome! We added a stainless steel drop in sink to help get rid of any persistent stains and an amazing stacking laundry basket shelf, video soon, to allow a decent amount of backup and/storage without making a terrible mess of the space!
This video was hard to cut down to a watchable length so be sure to check out the video links below were I go into more detail about certain tasks in this build
++++++++++++++++++++++++++++++++++++++++++++++++++++
DIY Circular Saw Track: https://youtu.be/PzA7-_iUR7Y
Stacking Laundry Basket Shelf: Video soon!
Laminate Counters: https://youtu.be/R-DHjuosD2w
How To Make Shaker Cabinet Doors: https://youtu.be/dfXcyx9vQJI
++++++++++++++++++++++++++++++++++++++++++++++++++++
Some Tools I Used (Affiliate Links):
Kreg Foreman: https://amzn.to/2X2NoLb
Kreg Corner Clamps: https://amzn.to/2SXqcPa
IsoTunes Xtra: https://amzn.to/2NBu7zw
FastCap 16oz Glue Bot: http://goo.gl/X5aNZ0
EDC Tool Belt: http://goo.gl/XZnWRx
Mirka 6" ROS Sander: https://amzn.to/2Eijyfv
Fuji Q5 5 Stage Turbine Spray System: https://goo.gl/ZAJF5g
3M Respirator: https://goo.gl/ZexRQd
SuperMax 16|32 Drum Sander: https://amzn.to/2QJ3iKi
9
views
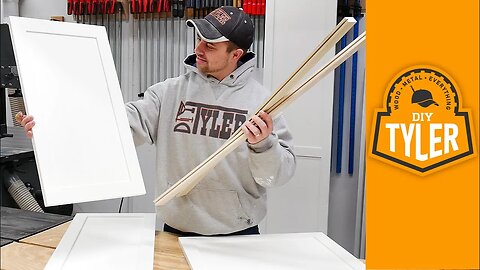
How To Make Shaker Cabinet Doors (KINDA EASY!)
I have been making A LOT of cabinet doors recently and in this video I show you my method for how to make shaker cabinet doors. I prefer to make mine using a router table for several reason, biggest being that the dust collection on my router table is pretty good so it doesn't make a mess in the shop. I also think the router table is more repeatable and you can get all sorts of different style router bits to spice up your doors and drawer faces!
These doors are made from solid poplar with a 1/4 maple panel.
(1:44) Break down material on the miter saw
(1:53) Thickness using the planer down to 3/4"
(2:17) Joint one side square
(2:41) Cut to just over 2" on the table saw
(3:05) Edge sand to 2" using the drum sander
(3:31) Route groves on all rails and styles on the router table
(4:15) Cut rails to final length on miter saw
(4:32) Route tongues on all rails using router table
(4:52) Cut panels on table saw
(5:28) Assemble doors
(6:21) Drum sand for perfect flatness (optional)
(6:56) Finish (Optional)
See all our digital plans, build something!
http://www.diytyler.com/product-category/plans/
Some Tools I Used (Affiliate Links)
Rail and Style Amana Bits: https://amzn.to/2t1W0nE
IsoTunes Xtra: https://amzn.to/2NBu7zw
FastCap 16oz Glue Bot: http://goo.gl/X5aNZ0
Mirka 6" ROS Sander: https://amzn.to/2Eijyfv
Fuji Q5 5 Stage Turbine Spray System: https://goo.gl/ZAJF5g
Bessey K Body Clamp Kit:P https://amzn.to/2SxQNhX
3M Respirator: https://goo.gl/ZexRQd
Rockler Router Table: http://bit.ly/2G2vIed
Rockler Router Dust Shroud: http://bit.ly/2Ssdg02
Rockler Coping Sled: https://amzn.to/2t1FBzr
SuperMax 16|32 Drum Sander: https://amzn.to/2QJ3iKi
#shakerdoors #cabinets #railandstyle
40
views
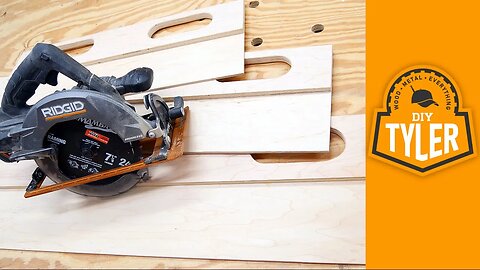
DIY Circular Saw Track | Build with ONE Tool!
Don't have a table saw? Build this DIY Circular Saw Track with ONE Tool...the circular saw!
Every time I used my previous homemade track guide in past videos someone would ask me what it was and if I had a video showing how I made it. A quick search shows a bunch of other creators that have made track guides but I guess it won't hurt to have another!
Using a few scraps of plywood or hardboard, and your circular saw, you can build yourself a DIY Track that turns your circular saw into a fully functioning Track Saw. Don't need any expensive tools, just a circular saw, and when you're done you can use that circ saw to rip and crosscut large pieces for you shop!
This is an easy way to help you break down large sheets of plywood so you don't have to wreak your back trying to move them into and around your shop. Break them down outside and then be able to work with smaller pieces in your shop.
*************************************************************
Big thanks to RIDGID for sponsoring our channel check out their latest power tool promotions!
https://www.ridgid.com/powertools/promotions/
Some tools I used (Affiliate Links:)
IsoTunes Xtra: https://amzn.to/2NBu7zw
Johnson Paste Wax: https://amzn.to/2RZEEFS
FastCap 16oz Glue Bot: http://goo.gl/X5aNZ0
FastCap Tape Measure: http://goo.gl/t2lWJD
EDC Tool Belt: http://goo.gl/XZnWRx
3M Respirator: https://goo.gl/ZexRQd
3M Respirator Filters: https://goo.gl/92Ejh0
RIDGID Cordless Circular Saw: https://goo.gl/DVc5Tc
RIDGID 5aH Battery: https://goo.gl/BAFCoa
RIDGID Cordless Trim Router: https://goo.gl/3jxBaz
16
views

How To Build Lockers For A Mudroom
We recently added on to our house and in this video I take you through the steps of how to build lockers for a mudroom! You saw us tile the space a while back and we are finally in the final stages of finishing the new space so it was time to move TWO of these giant lockers into the new Mudroom.
BIG thanks to Rockler for sponsoring this video, used SO many Rockler jigs that I have had for a long time to solve some tricky issues with this build. Be sure to visit their store locations or site for all your woodworking needs!
https://www.rockler.com/
Each locker is made from 2 sheets of 1/4" plywood, 2 sheets of 1/2" plywood and 5 sheets of 3/4" plywood and they are NOT light, very heavy and very sturdy! The are edged with solid maple edge banding to hopefully add some durability to the corners.
The doors over the 5 locker cubbies are shaker style with a solid poplar frame and 1/4" plywood as the panel. I will cover the building of the doors in an additional video as I think there is a lot of good information that I can share and I was out of time in this video. All the hardware for the doors are soft close euro hinges from Rocker, they are probable my favorite part of the whole build (besides the finish!)
The 5 drawers are made from 1/2" plywood using simple butt joints with wood glue and 18g brad nails. The drawer faces are made using the same shaker style as the door faces. I opted to spray a clear coat of poly on the drawers as I like the look of the natural wood when you open the drawer.
The locker cabinets and the drawer/door faces are finished with a water-born lacquer from Sherwin- Williams. It is called Kem Aqua Plus and it is FANTASTIC, laid down perfectly with no thinning, dried to sanding in no time, doesn't smell at all and as far as we can tell is super durable.
#lockers #mudroom #organization
Big thanks for RIDGID for sponsoring our channel check out their latest power tool promotions!
https://www.ridgid.com/powertools/promotions/
*****************************************************************
Some Tools I Used (Affiliate Links):
IsoTunes Xtra: https://amzn.to/2NBu7zw
FastCap 16oz Glue Bot: http://goo.gl/X5aNZ0
EDC Tool Belt: http://goo.gl/XZnWRx
Mirka 6" ROS Sander: https://amzn.to/2Eijyfv
Fuji Q5 5 Stage Turbine Spray System: https://goo.gl/ZAJF5g
Bessey K Body Clamp Kit:P https://amzn.to/2SxQNhX
3M Respirator: https://goo.gl/ZexRQd
3M Respirator Filters: https://goo.gl/92Ejh0
RIDGID Stealth Force Impact Driver: https://goo.gl/K2jKgG
Rockler Crosscut Sled: http://amzn.to/2ugAL53
18
views

Centerpiece Tabletop Lazy Susan
Today we are making a Tabletop Lazy Susan AND we are hosting a giveaway so you can win this project AND a pair of your very own Carolina boots!
Big thanks to Carolina show for supporting this channel, they keep these videos coming and free for you guys, show some support while saving some cash and use the link below if you need a awesome pair of shoes!
Get 15% off any purchase using code ‘DIYTYLER15’. Expires 12/31/18
Shop Carolina: http://bit.ly/DIYTylerCarolina
Better than 15% off is FREE! Head over to our website and enter the giveaway to with this handmade lazy Susan centerpiece and a pair of Carolina boots/shoes of your choice.
http://bit.ly/2PIRO52
********************************************************************
Funny how two of the three videos for Carolina shoe have been food related but oh well, who doesn't like food?! In this video I take a rather gnarly piece of cherry slab and turn it into a beautiful lazy Susan table center piece that will look great on any table. You can store napkins, spices and other condiments in the middle of the table and it can spin around for easy access for everybody!
Used a combination of the bandsaw, jointer, planer, table saw and router to make this woodworking project. Would have been nice to use a bigger router for cutting all the profiles but I don't have a 1/4" collet for my bigger router, slow and steady won the race though! Sealed the piece using general finishes Enduro Var, a good polyurethane finish that will hopefully prevent any warping in the future.
#lazysuzan # Woodworking #giveaway
^^^^^^^^^^^^^^^^^^^^^^^^^^^^^^^^^^^^^^^^^^^^^^^^^^^^^^^^^^^^^^^^^^^^^^
Some Tools I Used (Affiliate Links):
IsoTunes Xtra: https://amzn.to/2NBu7zw
FastCap 16oz Glue Bot: http://goo.gl/X5aNZ0
EDC Tool Belt: http://goo.gl/XZnWRx
Moisture Meter: https://amzn.to/2SwBy9i
Fuji Q5 5 Stage Turbine Spray System: https://goo.gl/ZAJF5g
Bessey K Body Clamp Kit:P https://amzn.to/2SxQNhX
Brayer Roller: http://goo.gl/bc5uIE
3M Respirator: https://goo.gl/ZexRQd
3M Respirator Filters: https://goo.gl/92Ejh0
RIDGID Cordless Trim Router: https://goo.gl/3jxBaz
General Finishes Enduro-Var: https://amzn.to/2nxHod7
SuperMax 16|32 Drum Sander: https://amzn.to/2QJ3iKi
Big thanks to RIDGID for sponsoring our channel check out their latest power tool promotions!
https://www.ridgid.com/powertools/promotions/
3
views

10 Gift Ideas For A Woodworker (HURRY!)
Realized the other day that Christmas is FAST upon us so I put together 10 Gift ideas for a woodworker. I wanted to do this last year....and never got to it...so we can say this video is either really late or just on time for Christmas this year!
In this video I share 10 gift ideas which include woodworking tools or machines that will compliment any gift list. If that workshop already has everything and you don't have any good ideas hopefully this will help you out! Each and every one of these tools has either saved me an INCREDIBLE amount of time or made the process of doing something, like sanding or painting, SO MUCH more enjoyable and safe.
We all want to be working in our wood shops for a long, long time and several these gifts will help keep you safe and healthy for the long haul.
********************************************************************
➤Gift List (Affiliate Links):
Mirka 6" ROS Sander: https://amzn.to/2Eijyfv
Fuji Q5 5 Stage Turbine Spray System: https://goo.gl/ZAJF5g
Micguire-Nicholes EDC tool belt: http://goo.gl/XZnWRx
Bessey 18" Quick Clamp: http://amzn.to/1KEuzQA
Bessey Gear Clamps: https://amzn.to/2Sv6BlJ
3M Respirator: https://goo.gl/ZexRQd
3M Respirator Filters: https://goo.gl/92Ejh0
Rockler Router Table: http://bit.ly/2G2vIed
Rockler Router Dust Shroud: http://bit.ly/2Ssdg02
SuperMax 16|32 Drum Sander: https://amzn.to/2QJ3iKi
10 Million Dollar Stick: https://amzn.to/2SrKvjS
2P-10 Fast Acting Glue: https://amzn.to/2E9n4bq
Moisture Meter: https://amzn.to/2SwBy9i
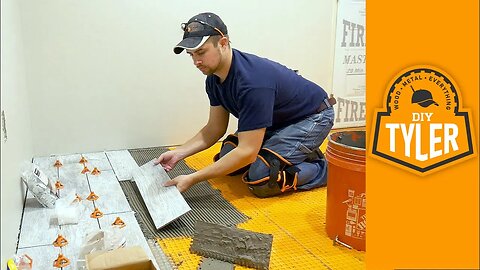
How to Install Wood Look Tile
We have been working on Wood Look Tile Installation. If you follow us on Instagram (which you totally should😀! http://www.DIYTyler.com/instagram.html ) you will have already seen the finished product and some of the in work shots! We are in the process of putting an addition on our house and I have taken over the completion at this point and first up was to install wood grain look tile flooring in the new mudroom, laundry room and bathroom.
👕👕👕👕👕👕👕👕👕👕👕👕👕👕👕👕👕👕👕👕👕👕👕👕👕👕👕👕👕👕👕
Get your Shirt on!! http://bit.ly/DITylerMERCH
👕👕👕👕👕👕👕👕👕👕👕👕👕👕👕👕👕👕👕👕👕👕👕👕👕👕👕👕👕👕👕
Check out all the other Addition videos!: https://www.youtube.com/playlist?list=PLsk0VxaVqgZEG4H3IPW4rh0j3P_Z5b4OL
#tilefloor #woodlooktile #DITRA
➤We wanted the best and longest lasting solution we could and all my research pointed towards using a product called DITRA. It is an uncoupling, waterproof membrane that can be installed directly over OSB, laminate or plywood with no need for concrete backer board.
Started the install process by making sure there were no bumps or lips on the sub flooring using a belt sander with 40 grit sanding belt. Then mixed up 50lbs (at a time) of Schluter All-Set and spread it using a 3/16" v groove trowel and laid the DITRA over it. You can proceed with tiling right over the DITRA immediately if you want, I first laid all the DITRA and them came back over the next few days and laid the tile.
Laid the tile using a 1/3rds pattern making all the cuts on my RIDGID tile saw. You can probably use a scribe and break tool but you won't be able to take sliver cuts if you need to. Laid the tile over All-Set spread using a 1/4x1/4 trowel and leveled them using the RIDGID level max system which was amazing.
OF NOTE: Usually you would have to lay the DITRA using a modified morter and the tile using an unmodified morter but the All-Set is specially formulated by Schluter to work for both applications.
Shout out to Schluter for sending us the DITRA and All-Set for use on this project. We wanted the best for our new addition and they came through for us! Check out their offerings:
https://www.schluter.com/schluter-us/en_US/
Big thanks to RIDGID for sponsoring our channel check out their latest power tool promotions!
https://www.ridgid.com/powertools/promotions/
➤Some tools I used (affiliate):
IsoTunes Xtra: https://amzn.to/2NBu7zw
RIDGID Level Max System: https://thd.co/2zznN2u
RIDGID Tile Tools: https://thd.co/2ABFQoi
Schluter Underlayment: https://amzn.to/2Rl61a1
Schluter All-Set: https://amzn.to/2Q2jNBL
RIDGID Cordless Belt Sander: https://amzn.to/2Q86YG3
EDC Belt Carry: http://goo.gl/XZnWRx
RevMarkers: https://goo.gl/UJZfnq
76
views

10 Gifts You Didn't Know the DIYer NEEDS! 2018
I checked out the calendar the other day and was shocked to see it it's already time to start shopping and thinking about Holiday and Christmas gifts! I JUST FINISHED SHOPPING FOR LAST YEAR!!
Not shown in any particular order of cost or how much I like one thing or another, I have put together 10 (and one bonus) items that I have received over time that have impressed me in ways I didn't expect or simply blew me away with how handy they are when I didn't expect them to be. All these gifts will be excellent gift ideas for the Do it Yourself person in your family. From comfortable boots, multi-tools, thermoses, Lights and cordless drills you will definitely be able to choose a gift that anyone in your family that fixes or builds anything on their own will love for years to come!
If you're looking for gifts for the woodworker that has everything already make sure you subscribe because I will fill you in next week (or so) with a list of 10 gifts for woodworkers!
GIFT LIST! (Some Affiliate links, if you buy using these links it helps us make these videos. Thanks!!)
28 Series Carolina Workboot: https://www.carolinashoe.com/CA7528
18V JobMax: https://amzn.to/2D9E5BL
12V JobMax: https://amzn.to/2SZS1nt
JobMax Rotozip attachment: https://amzn.to/2SUVbZs
JobMax Shear Head: https://thd.co/2qFOcGN
IsoTunes Xtra: https://amzn.to/2RMtlgO
Klean Kanteen Thermose: https://amzn.to/2DavVJo
EDC Belt Carry: http://goo.gl/XZnWRx
Leatherman Wave:https://amzn.to/2Fhgphp
Leatherman Skelatool: https://amzn.to/2JVBVak
T-Rex Tape: https://amzn.to/2DwxQJm
RIDGID 3 Panel LED light: https://amzn.to/2D8mKJv
RIDGID Gen5X Drill / Impact Kit: https://amzn.to/2DcsrWA
Big Frog Custom Hats: https://www.bigfrog.com/
Big thanks to RIDGID for sponsoring our channel check out their latest power tool promotions!
https://www.ridgid.com/powertools/promotions/
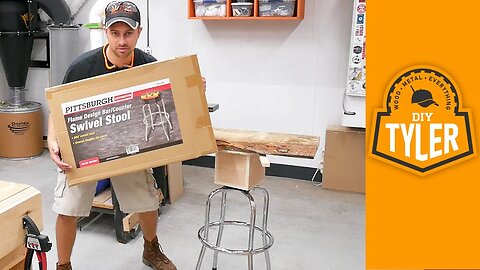
Hacking a Harbor Freight Stool into a Paint Stand Turntable
I have a TON of cabinet doors and drawer faces to paint in the near future and wanted to develop a convenient way of finishing them without having to walk around the work piece as I am spraying the finish. I went on Instagram and looked up different painters and cabinet makers to see if I could find a reference to work from or any other good ideas. I found a guy that had a sweet paint turntable / tripod setup that allowed him to spin his work piece without having to touch it and and get fingerprints all over his hard work.
Check out John Coppola, and give him a follow, he deserves more than 1300 followers!
https://www.instagram.com/jcop30/
Anyway, I spent a decent amount of time trying to come up with a clever yet inexpensive spinning / tripod / painting / spraying / turntable thingy and it hit me that a cheap spinning stool from Harbor Freight would be a great starting point.
I used the base of a spinning mechanics stool and added a spacer to bring the height to a more comfortable level. Added some arms to spin the turntable without touching the freshly painted work piece and a removable top that can be easily replaced once it gets too gummy.
I have used this to spray some smaller pieces and it worked great, excited to use it for all the doors and drawer faces that I need to finish up!
*****************************************************************
Big thanks to RIDGID for sponsoring our channel check out their latest power tool promotions!
https://www.ridgid.com/powertools/promotions/
Some Tools I Used (affiliate links):
IsoTunes Xtra: https://amzn.to/2NBu7zw
FastCap 16oz Glue Bot: http://goo.gl/X5aNZ0
Swanson Combination Square: http://goo.gl/EYuGAn
FastCap Tape Measure: http://goo.gl/t2lWJD
EDC Belt Carry: http://goo.gl/XZnWRx
RevMarkers: https://goo.gl/UJZfnq
3M Respirator: https://goo.gl/ZexRQd
3M Respirator Filters: https://goo.gl/92Ejh0
RIDGID Cordless Nailer: https://goo.gl/hFfGQw
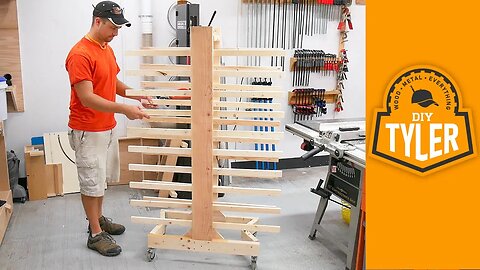
Folding Drying Rack for Finishing. YOU NEED THIS!
I have a TON of drawer faces and doors to paint in the next few weeks and I needed a proper way of storing them while they dry. You have all seen the drying racks that allow you to store a bunch of doors and drawer faces but these are all fairly large and unwieldy. I wanted to come up with a solution that could store 20 doors, be mobile and fold up to use less valuable space while it is stored away!
This folding paint drying rack is made from scraps of wood and castors that I had laying around the shop but if you needed to buy all the parts you are still likely looking at less than $50.
The frame is made to fold open and latch into place and the vertical arms can hold 20 doors or drawer faces. The entire unit is on castors so I can roll the stack of drawers into a more climate controlled area to allow the pieces to dry faster.
Big thanks to RIDGID for sponsoring our channel check out their latest power tool promotions!
https://www.ridgid.com/powertools/promotions/
____________________________________________________________
Some Tools I Used (Affiliate Links):
IsoTunes Xtra: https://amzn.to/2NBu7zw
FastCap 16oz Glue Bot: http://goo.gl/X5aNZ0
EDC Belt Carry: http://goo.gl/XZnWRx
RIDGID Stealth Force Impact Driver: https://goo.gl/K2jKgG
RIDGID Drill/Impact Combo: https://goo.gl/nA6wVj
3M Respirator: https://goo.gl/ZexRQd
3M Respirator Filters: https://goo.gl/92Ejh0
Dado Stack: https://amzn.to/2QOe7Ye
6
views
INVISIBLE Wireless Phone Charging Station / Device Organizer
Get your first audiobook for free when you try Audible for 30 days visit https://www.audible.com/diytyler or text diytyler to 500 500!
#wirelesscharging #chargingstation #organizedcharger
The area where we charge our phones and other electronic devices has been an absolute DISASTER since we moved into this house and it only gets worse as more devices make it into our home. Today we are going to use some scrap maple to make a organized charging station for all our phones. To make it even cooler we are going to incorporate INVISIBLE wireless chargers hidden behind a thin layer of wood.
The wireless charging station sports TWO hidden fast wireless chargers and a USB charging port that has 7 additional fast USB charging ports. It also has a shelf to hold a few books; out going snail mail and unused devices and a drawer to hide some of your more unsightly items.
The charging station is made from solid maple, assembled with finger / box joints and finished with general finishes enuro-var in a semi-gloss sheen.
Big thanks to RIDGID for sponsoring our channel check out their latest power tool promotions!
https://www.ridgid.com/powertools/promotions/
Some Tools I Use (Affiliate Links):
Wireless Charger: https://amzn.to/2Rdzkf8
IsoTunes Xtra: https://amzn.to/2NBu7zw
General Finishes Enduro-Var: https://amzn.to/2nxHod7
Mirka 6" ROS Sander: https://goo.gl/Dp85kf
Swanson Combination Square: http://goo.gl/EYuGAn
Bessey Quick Clamps: http://goo.gl/jVAzeu
FastCap Tape Measure: http://goo.gl/t2lWJD
EDC Belt Carry: http://goo.gl/XZnWRx
Rockler Croscut Sled: http://amzn.to/2ugAL53
3M Respirator: https://goo.gl/ZexRQd
3M Respirator Filters: https://goo.gl/92Ejh0
2
views