
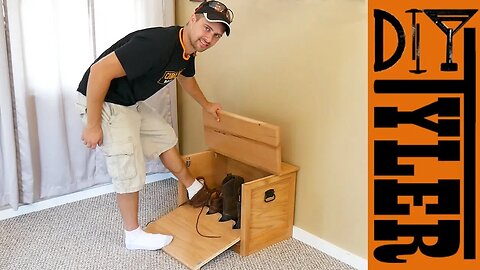
Folding Boot Puller Bench
Shop Carolina: http://bit.ly/CarolinaBootsDIYTyler
Use Coupon Code at checkout for 10% off your order. Valid on www.Carolinashoe.com. Coupon Code: ‘ DIYTylerBench10 ’
Expires: 12/31/18
We don't like shoes laying around in our house and even worse than that is big boots laying around! In this video I build a home to hide my Carolina Boots and it has a hidden feature! The top and the front fold out and act as a boot puller. Now you not only can hid your boots you don't have to kneel down to take them off!
Simply tip the front down and use the integrated boot pullers to slide your boots or shoes off! Close the front and lot and walla, you have a nice looking bench! When it's time to get your boots on you have a nice place to sit and tie up.
This bench was made from scrap 3/4" plywood that I had laying around my shop, only had to purchase hinges and handles. The box is assembled using wood glue and brad nails and finished with s sprayed on tinted topcoat.
Big thanks to RIDGID for sponsoring our channel check out their latest power tool promotions!
https://www.ridgid.com/powertools/promotions/
Some Tools I Used (affiliate links):
FastCap 16oz Glue Bot: http://goo.gl/X5aNZ0
FastCap Tape Measure: http://goo.gl/t2lWJD
EDC Belt Carry: http://goo.gl/XZnWRx
Mirka 6" ROS Sander: https://goo.gl/Dp85kf
Fuji Q5 5 Stage Turbine Spray System: https://goo.gl/ZAJF5g
Brayer Roller: http://goo.gl/bc5uIE
3M Respirator: https://goo.gl/ZexRQd
3M Respirator Filters: https://goo.gl/92Ejh0
Ear Plugs: https://goo.gl/R937J7
RIDGID Cordless Nailer: https://goo.gl/hFfGQw
Rockler Croscut Sled: http://amzn.to/2ugAL53
Rockler BeadLock System: https://amzn.to/2OnqQzJ
2
views

Until We Meet Again | Engraved Concrete Memorial Bench
On August 30, 2017 we received a knock on our door that changed our lives forever. The Marine Corps have come to inform us that my little brother had passed away during a training exercise. This bench is for him so I can sit and chat when I visit him.
Visit https://ironmikefoundation.com/ if you wish to learn more and support the foundation started in Michael's name.
________________________________________________________________
Bench is made from a homemade mixture of glass fiber re-enforced concrete with custom welded metal legs.
I CNCed a template and used a two part silicone mold making mixture to make a reusable mold for the lettering that I wanted on the side of the bench. Once the lettering mold was complete I made a melamine form with the lettering mold inset and sprayed the first thin layer of concrete to achieve the smoothest finish. I then poured the rest of the concrete and covered with a tarp to let it set up.
After removing the form I did a bit of sanding on the concrete slab and set it aside.
The legs are made from 2x2 metal tubing. I cut everything to allow for a 15° angle splay of the legs. After welding and painting them I bolted them to the bottom of the bench.
A coat of concrete sealer and the bench was ready for use.
_______________________________________________________________
Big thanks to RIDGID for sponsoring our channel check out their latest power tool promotions!
https://www.ridgid.com/powertools/promotions/
Some Tools I Used:
Smooth-On Mold Making: https://amzn.to/2C67ttw
Rockler Croscut Sled: http://amzn.to/2ugAL53
RIDGID Cordless Angle Grinder: https://goo.gl/807O2y
Lincoln TIG 200: https://amzn.to/2Mzrj0U
3M Respirator: https://goo.gl/ZexRQd
3M Respirator Filters: https://goo.gl/92Ejh0
Ear Plugs: https://goo.gl/R937J7
EDC Belt Carry: http://goo.gl/XZnWRx
RevMarkers: https://goo.gl/UJZfnq
Man Down Kevin MacLeod (incompetech.com)
Licensed under Creative Commons: By Attribution 3.0 License
http://creativecommons.org/licenses/by/3.0/
For the Fallen Kevin MacLeod (incompetech.com)
Licensed under Creative Commons: By Attribution 3.0 License
http://creativecommons.org/licenses/by/3.0/
Taps v2 Kevin MacLeod (incompetech.com)
Licensed under Creative Commons: By Attribution 3.0 License
http://creativecommons.org/licenses/by/3.0/
4
views
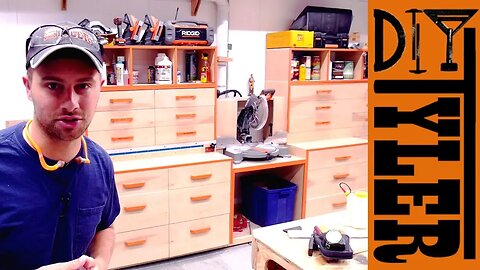
DIYTyler Miter Saw Station | Design Thoughts and Details | LTL
Welcome back to another Learn the Logic series video! This is a series of videos were we talk about something that I built and why I built it the way that I did. This video we are discussing the DIYTyler Miter Saw Station.
This miter station is design for a non sliding miter saw. It features 24 drawers of various depths, 6 storage cubbies, a miter stop block, folding extension wing and a dust hood for the miter saw. The entire station is made from 3/4" and 1/2" plywood and has sturdy full extension drawer slides for all the drawers.
Plans for the Miter Station:
http://www.diytyler.com/shop/miter-station-plans/
Full Extension Drawer Slides:
Amazon: https://amzn.to/2BKLzvR
Ebay: https://ebay.to/2P6ASFT
Jay Bate's Plans (for a sliding saw):
https://www.youtube.com/watch?v=HakMdsMPe4s&list=PLV3AJNpUo-N-DBdI8o5tXNqA8hV3Xd3yU
LTL Miter Saw Dust Hood
https://www.youtube.com/watch?v=tuIBl7NjYI4
Jeremy's Channel:
https://www.youtube.com/channel/UC0T7tvy44mlQCjaTtparOZw
Tools I Use:
FastCap 16oz Glue Bot: http://goo.gl/X5aNZ0
FastCap Tape Measure: http://goo.gl/t2lWJD
EDC Belt Carry: http://goo.gl/XZnWRx
3M Respirator: https://goo.gl/ZexRQd
3M Respirator Filters: https://goo.gl/92Ejh0
Ear Plugs: https://goo.gl/R937J7
RIDGID Stealth Force Impact Driver: https://goo.gl/K2jKgG
2
views
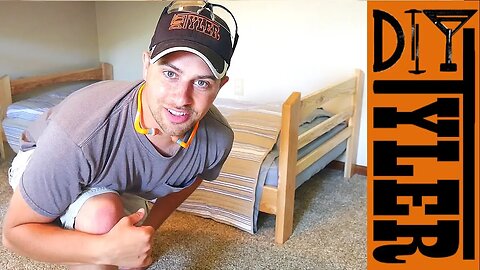
DIY Twin Bed
Watch how to make a kids twin bed to complete the "Cape Cod" bunk bed build! This twin bed is made from solid ash and assembled with loose mortise and tenon joinery using the new Rockler woodworking and Hardware BeadLock system. The bed is knock down style so the head and foot board assemblies are easy to remove from the rails, easy to move from room to room!
I used rough sawn solid ash from a local saw mill for the build as it is MUCH cheaper than buying already surfaced wood. I used a combination of the Jointer, planer and band saw to dimension all the wood to the proper size. Then I find tuned to the dimensions I needed for the bed using the table saw and miter saw.
Assembly was completed with wood glue and the Rockler BeadLock system. This system is a simple method of creating loose mortises using a drill. After some careful measurements I drilled all the mortises and assembled the head and foot boards.
The Knock down functionality is done using some bed hardware from Rockler. You will need several slightly unique drill bits to complete the assembly but nothing you can't get at Rocker or a local hardware store.
The bed is finished using 3 coats General Finishes Enduro -Var sprayed on.
~~~~~~~~~~~~~~~~~~~~~~~~~~~~~~~~~~~~~~~~~~~
Be sure to check out Rockler for all your woodworking needs! Supporting them supports us and keeps these videos free for you!
https://www.Rockler.com
Big thanks to RIDGID for sponsoring our channel check out their latest power tool promotions!
https://www.ridgid.com/powertools/promotions/
~~~~~~~~~~~~~~~~~~~~~~~~~~~~~~~~~~~~~~~~~~~
Some Tools and Supplies I used (Affiliate Links:)
Rockler BeadLock System: https://amzn.to/2OnqQzJ
Rockler Bed Hardware: https://amzn.to/2Maud0b
General Finishes Enduro-Var: https://amzn.to/2nxHod7
FastCap 16oz Glue Bot: http://goo.gl/X5aNZ0
Swanson Combination Square: http://goo.gl/EYuGAn
FastCap Tape Measure: http://goo.gl/t2lWJD
EDC Belt Carry: http://goo.gl/XZnWRx
Mirka 6" ROS Sander: https://goo.gl/Dp85kf
Fuji Q5 5 Stage Turbine Spray System: https://goo.gl/ZAJF5g
3M Respirator: https://goo.gl/ZexRQd
3M Respirator Filters: https://goo.gl/92Ejh0
Ear Plugs: https://goo.gl/R937J7
RIDGID Cordless Trim Router: https://goo.gl/3jxBaz
4
views
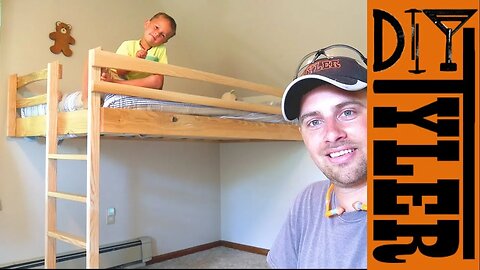
$40 Ash Loft Bed!! SAVE SPACE AND MONEY
Get your plans! http://www.diytyler.com/shop/loft-bed-twin/
Plans have provisions for hardwood and construction lumber bill of materials.
👕👕👕👕👕👕👕👕👕👕👕👕👕👕👕👕👕👕👕👕👕👕👕👕👕👕👕👕👕👕👕
Get your Shirt on!! http://bit.ly/DITylerMERCH
👕👕👕👕👕👕👕👕👕👕👕👕👕👕👕👕👕👕👕👕👕👕👕👕👕👕👕👕👕👕👕
Our home is a cape cod style house which means the peak of the roof angles through the upper bedrooms. We have wanted to add a bunk bed into these rooms and in a way that would fit into the room and still allow comfortable sleeping on a twin mattress.
I could not come up with a good bunk bed design that was attached so I opted to break the bed into two parts, a loft bed and a twin bed.
In this video we will be building a loft bed out of rough ash wood that I got for $40 from a local sawyer. If you have the tools and capability to get rough hardwood vs surfaced on 4 sides (S4S) you will save yourself a TON of money. Yes, I know that it is $40 in wood but a lot in tools. I took many years and lots of craiglists finds to build up my shop. DON'T let the fact that you think you don't have the tools stop you.
This loft bed is assembled using 1/2" dowels and some wood screws for the ladder and railing.
Big thanks to RIDGID for sponsoring our channel check out their latest power tool promotions!
https://www.ridgid.com/powertools/promotions/
Some Tools I used (affiliate links):
Rockler 1/2" Doweling Jig: https://amzn.to/2OofVXx
Rocker Glue Applicator Set: https://amzn.to/2NRu8uV
FastCap 16oz Glue Bot: http://goo.gl/X5aNZ0
FastCap Tape Measure: http://goo.gl/t2lWJD
EDC Belt Carry: http://goo.gl/XZnWRx
Mirka 6" ROS Sander: https://goo.gl/Dp85kf
Fuji Q5 5 Stage Turbine Spray System: https://goo.gl/ZAJF5g
3M Respirator: https://goo.gl/ZexRQd
3M Respirator Filters: https://goo.gl/92Ejh0
Ear Plugs: https://goo.gl/R937J7
RIDGID Stealth Force Impact Driver: https://goo.gl/K2jKgG
RIDGID Spindle Sander: https://goo.gl/NURw0c
RIDGID Cordless Trim Router: https://goo.gl/3jxBaz
11
views
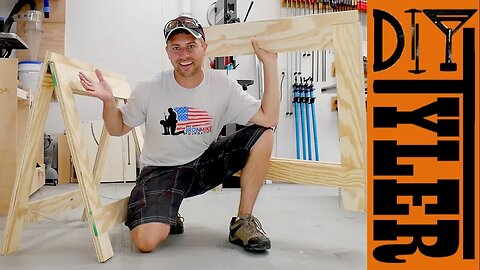
Best Saw Horses EVER?!
I cannot stand conventional 2x4 saw horses. I think they are too bulky, don't store well and are not really that stable. Today I will be making folding saw horses using 1/2 plywood, door hinges and a few lengths of chain.
I gave a good amount of thought towards a design of my own but could not come up with something that is better than those already out there. I chose the John Heisz design and they haven't disappointed. This is not the first time I have used a design from John and I have been very pleased with the success both times.
John's Plans:
https://ibuildit.ca/wp-content/uploads/saw-horses.skp
You will need to have SketchUp installed on your computer to open and view this plan.
Sketchup: https://www.sketchup.com/
John's Build Video ( more detail but no cute kids:) https://www.youtube.com/watch?v=jZwS86XBSaU
These are a super easy build and can be completed with just a circular saw if that is all you have.
Big thanks to RIDGID for sponsoring our channel check out their latest power tool promotions!
https://www.ridgid.com/powertools/promotions/
13
views
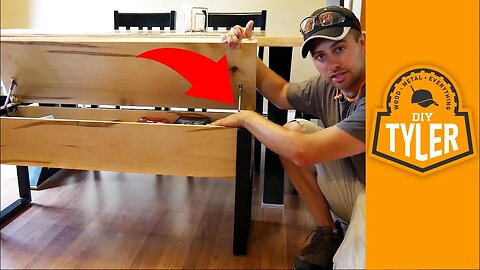
Building a Kitchen Bench with Soft Close Hinges
This week we finally added a matching maple bench to our kitchen dining set. This bench is made from solid maple and custom made minimal metal 1x2 tubing legs.
The bench has a large hidden storage area for kids coloring books, crayons, place mats or anything else that you need close to a table. The large slab top has soft close hinges to prevent little fingers from getting smashed when the bench top is closed.
The box section of the bench is assembled with miters and strengthened with maple dovetail splines that add a ton of strength and are very decorative.
********************************************************************
Supporting our sponsors directly supports us and keeps these videos free for you guys!
Rockler Woodworking and Hardware:
http://www.rockler.com/
RIDGID Power Tools
https://www.ridgid.com/powertools/promotions/
********************************************************************
Some Tools I Used:
Rockler Soft Close Hinges: https://amzn.to/2lJLnSY
FastCap 16oz Glue Bot: http://goo.gl/X5aNZ0
EDC Belt Carry: http://goo.gl/XZnWRx
Lincoln TIG 200: https://amzn.to/2Mzrj0U
General Finishes Arm R Seal: https://goo.gl/Hkamo8
Swanson Combination Square: http://goo.gl/EYuGAn
3M Respirator: https://goo.gl/ZexRQd
3M Respirator Filters: https://goo.gl/92Ejh0
Ear Plugs: https://goo.gl/R937J7
Bessey 18" Quick Clamp: http://amzn.to/1KEuzQA
Mirka 6" ROS Sander: https://goo.gl/Dp85kf
Rockler Croscut Sled: http://amzn.to/2ugAL53
1
view
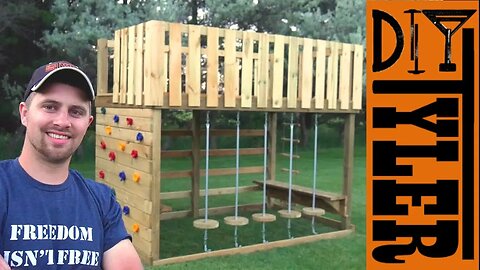
Mini Obstacle Course / Jungle Gym / Climbing Gym for your Kids
http://www.diytyler.com/shop/obstacle-course/
👕👕👕👕👕👕👕👕👕👕👕👕👕👕👕👕👕👕👕👕👕👕👕👕👕👕👕👕👕👕👕
Get your Shirt on!! http://bit.ly/DITylerMERCH
👕👕👕👕👕👕👕👕👕👕👕👕👕👕👕👕👕👕👕👕👕👕👕👕👕👕👕👕👕👕👕
A year ago we build the worlds greatest swing set, which has been a SMASH hit on YouTube the kids and their friends. The only way I could think to make the swing set even better was too add on some more activities!
Follow as I build an obstacle course with a rock wall, rope ladder, monkey bars, ladder wall, Island bridge and elevated platform for our kids when they play in the backyard.
This jungle gym is perfect for a smaller backyard and still provides your kids with tons to play on.
*************************************************************
Big thanks to RIDGID for sponsoring our channel check out their latest power tool promotions!
https://www.ridgid.com/powertools/promotions/
Some Tools I Used (affiliate links):
EDC Belt Carry: http://goo.gl/XZnWRx
RIDGID Stealth Force Impact Driver: https://goo.gl/K2jKgG
RIDGID Drill/Impact Combo: https://goo.gl/nA6wVj
RIDGID Cordless Circular Saw: https://goo.gl/DVc5Tc
RIDGID 5aH Battery: https://goo.gl/BAFCoa
RIDGID Reciprocating saw: https://goo.gl/b2qH23
RIDGID Cordless Angle Grinder: https://goo.gl/807O2y
RIGID Cordless MiterSaw: https://goo.gl/JLaIij
8
views
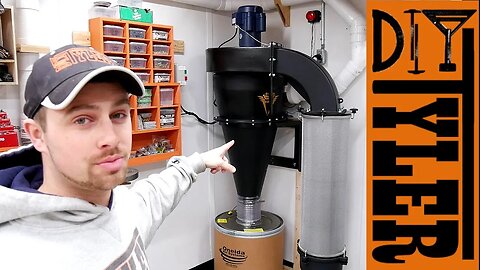
Shop Dust Collector UPGRADE! | Oneida V-System 3000 Dust Collector
A wood shop dust collector is one of the most critical tools in the shop but is often overlooked. I have been running a highly modified Harbor Freight dust collector with an Oneida Super Dust Deputy cyclone for several years now and it worked very well in my old shop but was a little lacking in power for the new space. Not sure if it was the layout of the new shop but it was time for an upgrade.
I reached out to Oneida to see if they wanted to put a system in the shop and they offered to place a new V-system 3000 and I was all game! This DC is a MASSIVE upgrade over my modified system. 3HP vs a "2HP" harbor freight motor but the biggest difference is the impeller. The HF model has a 7-8" impeller and the V-System has a 15" monster of an impeller, what a difference!
I also installed a Dust Sentry sensor to notify me when the dust bin is full and prevent overfilling and clogging of the HEPA filter.
Big thanks to Oneida for outfitting the shop with the new system, be sure to checkout their website for all your dust collection, and cyclone needs.
https://www.oneida-air.com/
V-System Cyclones
https://www.oneida-air.com/inventory.asp?CatId=%7B883C6AA7-4C85-49FD-9EEA-C51D09DC8B19%7D
Dust Sentry
https://www.oneida-air.com/inventoryD.asp?item_no=AXB999110B&CatId=%7B428A1AFA-E859-459E-8BF9-47817428D9AF%7D
Big thanks to RIDGID for sponsoring our channel check out their latest power tool promotions!
https://www.ridgid.com/powertools/promotions/
Some tools I Used (Affiliate Links):
EDC Belt Carry: http://goo.gl/XZnWRx
FastCap Tape Measure: http://goo.gl/t2lWJD
FastCap 16oz Glue Bot: http://goo.gl/X5aNZ0
RIDGID Stealth Force Impact Driver: https://goo.gl/K2jKgG
1
view

Never Have DULL Mower Blades Again!! Mower Blade Sharpening Jig
I have been trying to come up with a clever solution for sharpening mower blades for over a year now and a solution finally hit me the other day and it is elegantly simple! This sharpening jig is a form of tool box made from scrap plywood assembled using box joint joinery.
This allows you to stash some grinding discs, angle grinder and impact wrench along with a spare set of mower blades in one easy to carry box. The sharpening portion is a compound angled spline complete with a toggle clamps. This allows you to set the mower blade in place at the same angle every time so you only have to focus on keeping your angle grinder level.
I was actually surprised how stationary the setup stayed when sharpening a blade, I thought it would slide around a little but it is rock solid. Works great and you get razor sharp mower blades every time!
👕👕👕👕👕👕👕👕👕👕👕👕👕👕👕👕👕👕👕👕👕👕👕👕👕👕👕👕👕👕👕
Get your Shirt on!! http://bit.ly/DITylerMERCH
👕👕👕👕👕👕👕👕👕👕👕👕👕👕👕👕👕👕👕👕👕👕👕👕👕👕👕👕👕👕👕
_________________________________________________________________
Big thanks to RIDGID for sponsoring our channel check out their latest power tool promotions!
https://www.ridgid.com/powertools/promotions/
Some tools I used (Affiliate Links):
FastCap 16oz Glue Bot: http://goo.gl/X5aNZ0
RIDGID Cordless Angle Grinder: https://goo.gl/807O2y
RIDGID Cordless Trim Router: https://goo.gl/3jxBaz
Swanson Combination Square: http://goo.gl/EYuGAn
Bessey Quick Clamps: http://goo.gl/jVAzeu
FastCap Tape Measure: http://goo.gl/t2lWJD
EDC Belt Carry: http://goo.gl/XZnWRx
RevMarkers: https://goo.gl/UJZfnq
Mirka 6" ROS Sander: https://goo.gl/Dp85kf
3M Respirator: https://goo.gl/ZexRQd
3M Respirator Filters: https://goo.gl/92Ejh0
Ear Plugs: https://goo.gl/R937J7
9
views
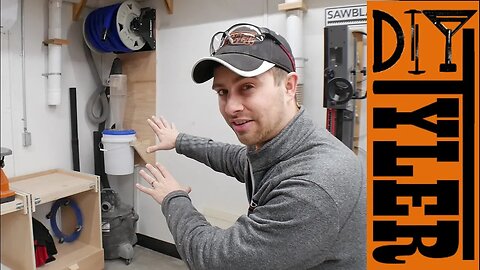
Space Saving Vertical Shop Vac Cyclone Separator for the Shop
For those of you that have been following the channel for a long time know that I have never been happy with the state of the shop vac, cyclone, shop vac hose and attachment situation. The shop vac is a necessity in the shop but it simply took up too much room, cyclone tipped over all the time and it took too long to wind the hose back up again when finished cleaning.
Time for a solution! A vertical shop vac / Cyclone / hose reel put all the cleaning equipment in the same footprint of the shop vac opening up space and making the overall use of the system much faster. The system consists of a 5 3/4 HP shop vac, Clear Vue Mini CV-06 cyclone and a Rockler Dust Right hose real with 40' of 1 1/2" shop vac hose. Now I can fire up the shop vac with a remote switch, unwind the hose and clean ALL corners of the shop and quickly wind it back up again.
Thanks for Rockler Woodworking and Hardware for sponsoring this video.
http://www.rockler.com/
Big thanks to RIDGID for sponsoring our channel check out their latest power tool promotions!
https://www.ridgid.com/powertools/promotions/
Some Tools I Used (Affiliate Links);
Dust Right Hose Reel: https://amzn.to/2rktDzQ
Dust Right Hose: https://amzn.to/2rjyBNa
Dust Right Dust Separator: https://amzn.to/2KDU8sS
Dust Right Universal Adapter: https://amzn.to/2HRvHXb
Rockler Croscut Sled: http://amzn.to/2ugAL53
FastCap 16oz Glue Bot: http://goo.gl/X5aNZ0
FastCap Tape Measure: http://goo.gl/t2lWJD
EDC Belt Carry: http://goo.gl/XZnWRx
RevMarkers: https://goo.gl/UJZfnq
Ear Plugs: https://goo.gl/R937J7
RIDGID Cordless Nailer: https://goo.gl/hFfGQw
17
views
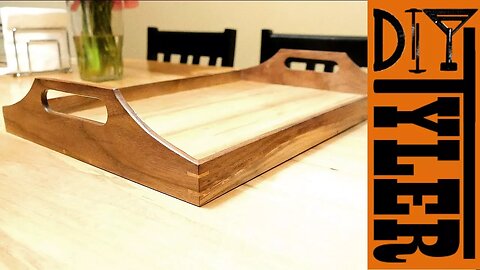
Wooden Serving Tray for Outdoor Grilling | Carolina Giveaway!
Shop Carolina: http://bit.ly/CarolinaDIYTyler
Get 10% off using code DIYTYLER10 at checkout. Code expires 5/31/18.
In this video I build a wooden serving tray using some scrap maple and walnut. This tray will allow me to bring a plate of stakes, burgers, utensils and spices out to the grill in one trip.
Summer is coming (I think) and this is a perfect project to get you ready for the outdoor cooking season. I don't know about you but I love grilling dinner for my family on the grill and this will save me trips in and out of the house giving me more time to work in the shop!!
***************************************************
CLOSED: Congrats to Jenny Ham!
https://www.instagram.com/hamjenny66/
I actually made two of these serving trays and Carolina Shoe and I a giving one away along with a Carolina goodie package and a FREE pair of shoes or workboots of your choise.
******************************************************
Big thanks to RIDGID for sponsoring our channel check out their latest power tool promotions!
https://www.ridgid.com/powertools/promotions/
Some Tools I used (Affiliate Links):
FastCap 16oz Glue Bot: http://goo.gl/X5aNZ0
Swanson Combination Square: http://goo.gl/EYuGAn
FastCap Tape Measure: http://goo.gl/t2lWJD
EDC Belt Carry: http://goo.gl/XZnWRx
RevMarkers: https://goo.gl/UJZfnq
Mirka 6" ROS Sander: https://goo.gl/Dp85kf
Brayer Roller: http://goo.gl/bc5uIE
3M Respirator: https://goo.gl/ZexRQd
3M Respirator Filters: https://goo.gl/92Ejh0
Ear Plugs: https://goo.gl/R937J7
General Finishes Arm R Seal: https://goo.gl/Hkamo8
9
views
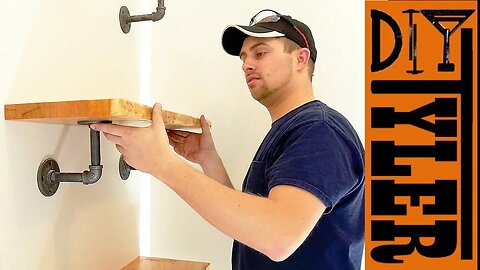
Iron Pipe Shelves DIY
How to build a live edge office shelf using a live edge hardwood cherry slab and industrial black pipe mounting hardware.
This project started with a slab of cherry hardwood that I got flattened at my local hardwood dealer. I chose to have it flattened as it saved me a ton of time and I have already shown the process of flattening larger slabs with a router sled in past videos.
Once the slabs were flattened I had to add a strip to each shelf to make them the depth that the customer wanted. The live edge bark was removed with a hammer and sander as I did not want to do an epoxy finish which is the best way to keep bark on a live edge piece.
The shelves were finished with 3 coats of general finishes arm-r-seal, my go to finish for hardwoods.
The shelves are mounted using black plumbing pipe as the hardware. All the pipe is 1/2" black pipe cleaned using acetone and steel-wool. Once the pipe was cleaned I assembled and finished with past was to prevent any rusting.
Dr. Nick
https://www.youtube.com/channel/UCsHqu8IYwBjNLYk2MrNIxuw
Supporting our sponsors helps support the channel!
https://wwwSawBlade.com
https://www.ridgid.com/powertools/promotions/
Some Tools I Used (Affiliate Links):
EDC Belt Carry: http://goo.gl/XZnWRx
FastCap 16oz Glue Bot: http://goo.gl/X5aNZ0
RevMarkers: https://goo.gl/UJZfnq
Mirka 6" ROS Sander: https://goo.gl/Dp85kf
Brayer Roller: http://goo.gl/bc5uIE
3M Respirator: https://goo.gl/ZexRQd
3M Respirator Filters: https://goo.gl/92Ejh0
Ear Plugs: https://goo.gl/R937J7
RIDGID Drill/Impact Combo: https://goo.gl/nA6wVj
RIDGID 18V Hybrid LED Light Panels: https://goo.gl/w9eAkH
General Finishes Arm R Seal: https://goo.gl/Hkamo8
12
views

How to Make $65 Wooden Library Shelves that will Last FOREVER!
How to make wooden library shelves for only a few dollars more than Ikea flat pack furniture. These will last forever and they are easy to make!
Build your own**** downloadable PDF plans; https://www.diytyler.com/shop/library-shelf/
To break down the purebond plywood I used the table saw. Be sure to pay attention to your cut order as you have JUST enough plywood in one sheet to make a single shelf unit. Shelves get cut first, then the vertical supports.
Used the table saw to cut a rabbet into the back of the vertical supports to accept the backer board. This board prevents the books from falling off the back of the shelves but also adds a tremendous amount of support to the shelf itself.
I added iron on edge banding to add that final finishing touch to the wooden piece.
Finished the shelves using a tinted topcoat, this combines the staining and finishing process into one step and saves a TON of time.
************************************************************
Support our efforts by Supporting our great Sponsors!
Rockler Woodworking and Hardware
http://www.rockler.com/
Columbia Forest Products
http://purebondplywood.com/
RIDGID Power Tools
https://www.ridgid.com/powertools/promotions/
*************************************************************
Some tools I used (Affiliate Links):
Rockler Shelf Pin Jig: http://amzn.to/2GltWEd
Rockler Croscut Sled: http://amzn.to/2ugAL53
EDC Belt Carry: http://goo.gl/XZnWRx
RevMarkers: https://goo.gl/UJZfnq
Mirka 6" ROS Sander: https://goo.gl/Dp85kf
Fuji Q5 5 Stage Turbine Spray System: https://goo.gl/ZAJF5g
3M Respirator: https://goo.gl/ZexRQd
3M Respirator Filters: https://goo.gl/92Ejh0
Ear Plugs: https://goo.gl/R937J7
RIDGID Cordless Circular Saw: https://goo.gl/DVc5Tc
RIDGID 5aH Battery: https://goo.gl/BAFCoa
RIDGID 18V Hybrid LED Light Panels: https://goo.gl/w9eAkH
Varathane Ultimate Waterbased Poly: http://amzn.to/2iouV9q
10
views

Live Edge Epoxy River Desk with Black Galvanized Pipe Base
Watch as I show how to turn a wood cherry slab into a live edge desk with an epoxy river flowing through the table top sitting atop black galvanized pipe metal base. This desk started as a 23" wide cherry slab from my local wood source. Since I have already shown the process of flattening with a router sled I figured I would save the time and the mess by stopping by a different local wood source and try to have the wide slabs flattened on their massive machinery. Unfortunately there was too much twist in the slabs so we had to cut them in half but either way I saved a TON of time and huge mess by having the local guys flatten the slabs.
Once I was back in the woodshop I jointed and joined the wood back into one wide slab and added some inlayed walnut bowties. As we were planning the wood there were some holes and inclusions in the wood that needed to be filled so I chiseled and sanded out a river through the wood.
To finish the slab I filled the river that I made with fish tank rock and poured epoxy over to seal and harden everything.
The base is made form 3/4" black galvanized pipe available at your local home center.
****************************************************************
Dr. Nick Zyrowski's Channel:
https://www.youtube.com/channel/UCsHqu8IYwBjNLYk2MrNIxuw
Check out SawBlade.com for all your wood and metal cutting needs.
https://www.SawBlade.com
Big thanks to RIDGID for sponsoring our channel check out their latest power tool promotions!
https://www.ridgid.com/powertools/promotions/
******************************************************************
Some tools I Used (affiliate Links):
Table Top Epoxy: http://amzn.to/2tuU5eq
FastCap 16oz Glue Bot: http://goo.gl/X5aNZ0
EDC Belt Carry: http://goo.gl/XZnWRx
Mirka 6" ROS Sander: https://goo.gl/Dp85kf
Brayer Roller: http://goo.gl/bc5uIE
3M Respirator: https://goo.gl/ZexRQd
3M Respirator Filters: https://goo.gl/92Ejh0
Ear Plugs: https://goo.gl/R937J7
RIDGID Cordless Trim Router: https://goo.gl/3jxBaz
General Finishes Arm R Seal: https://goo.gl/Hkamo8
RIDGID 18V Hybrid LED Light Panels: https://goo.gl/w9eAkH
80
views
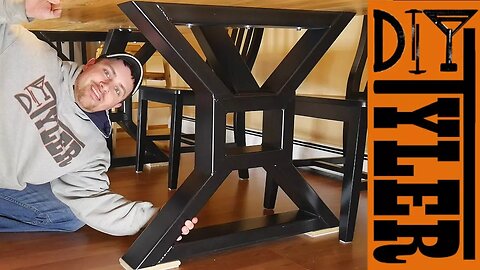
HomeMade Farmhouse Table Legs | Metalworking
In the last build video we made the live edge table top for our new kitchen table and in this video I fabricate the metal farmhouse table base. The leg assemblies are made from 2x4 metal tubing with 1/8th inch wall. I used a TIG welder to tack each table base leg together and then used the MIG welder to fill the gaps and add strength.
The table base was finished with a coat of self etching primer and then a few coats of semi gloss black enamel paint. After the paint cured we bolted the legs onto the live edge maple slab we made in the last video.
👕👕👕👕👕👕👕👕👕👕👕👕👕👕👕👕👕👕👕👕👕👕👕👕👕👕👕👕👕👕👕
Get your Shirt on!! http://bit.ly/DITylerMERCH
👕👕👕👕👕👕👕👕👕👕👕👕👕👕👕👕👕👕👕👕👕👕👕👕👕👕👕👕👕👕👕
Big thanks to Douglas for stopping by and dropping some TIG welding knowledge. Check his channel here:
https://www.youtube.com/channel/UC8NjHgDV5nHEfQGj7JNfp9Q
Check out Sawblade.com and the Trajen 125 BandSaw:
https://www.sawblade.com/order-bandsaw-machine-trajan125.cfm
Big thanks to RIDGID for sponsoring our channel check out their latest power tool promotions!
https://www.ridgid.com/powertools/promotions/
Some tools I Used (affiliate links):
Swanson Combination Square: http://goo.gl/EYuGAn
FastCap Tape Measure: http://goo.gl/t2lWJD
EDC Belt Carry: http://goo.gl/XZnWRx
RevMarkers: https://goo.gl/UJZfnq
FastCap Long Nose Marker: http://amzn.to/1QxS7va
3M Respirator: https://goo.gl/ZexRQd
3M Respirator Filters: https://goo.gl/92Ejh0
Ear Plugs: https://goo.gl/R937J7
RIDGID Cordless Angle Grinder: https://goo.gl/807O2y
RIDGID 18V Hybrid LED Light Panels: https://goo.gl/w9eAkH
5
views
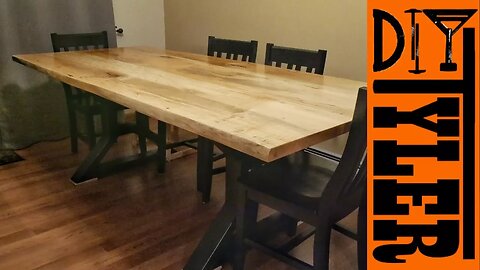
Live Edge Maple Slab Farmhouse Table
Build a live edge maple slab dining room farmhouse table. This project actually started a year ago when I was picking up some hardwood lumber and saw these maple slabs being milled up. As soon as I saw them I knew that we needed those maple slabs for our future kitchen table.
Fast forward a year later when the live edge slabs had been kiln dried I got them home and started to work on the farmhouse table fabrication. In the end we decided that we were going to build a metal base for the table and leave the maple slabs natural with their live edge.
In this video I go through the steps to use a router sled to flatten large wood slabs in your workshop, plan the slabs to proper dimension, joint the edges for a proper glue up and glue up the 42" wide maple live edge slab.
For finishing the slab I sanded up to 180 grit, fixed any knot holes or defects in the slabs with untinted two part epoxy and sealed it with general finishes arm r seal. Two coats on the bottom and three coats on the top. You always want to seal all surfaces of a large slab like this to aid with even wood movement.
Leg Dimensional Plans:
The fabrication of the custom metal legs will be covered in another video. Link to that below when it is available.
Wood and Resin Lamp Video: https://youtu.be/1iuSeDO4234
Portable Mortiser: https://youtu.be/L7Bu9z7G9Fc
Big thanks to RIDGID for sponsoring our channel check out their latest power tool promotions!
https://www.ridgid.com/powertools/promotions/
Some Tools I Used (affiliate Links);
Router Flattening Bit: http://amzn.to/2sjjF5k
General Finishes Arm R Seal: https://goo.gl/Hkamo8
FastCap 16oz Glue Bot: http://goo.gl/X5aNZ0
EDC Belt Carry: http://goo.gl/XZnWRx
Swanson Combination Square: http://goo.gl/EYuGAn
FastCap Tape Measure: http://goo.gl/t2lWJD
RevMarkers: https://goo.gl/UJZfnq
Mirka 6" ROS Sander: https://goo.gl/Dp85kf
Brayer Roller: http://goo.gl/bc5uIE
3M Respirator: https://goo.gl/ZexRQd
3M Respirator Filters: https://goo.gl/92Ejh0
Ear Plugs: https://goo.gl/R937J7
RIDGID Cordless Circular Saw: https://goo.gl/DVc5Tc
73
views
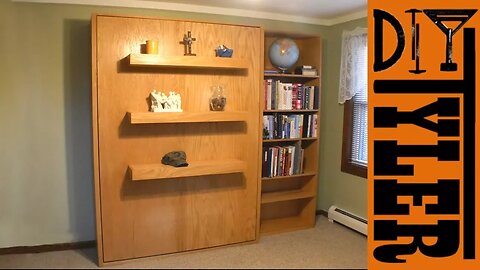
Murphy Bed with Cheap $20 Hardware
How to build a wooden Murphy wall bed with twenty dollar hardware. Save a TON of money by not buying an off the shelf Murphy bed kit for almost $300 and make your own with these simple boat seat swivel bearings.
The wall bed is made from 3/4" red oak PureBond plywood and the design is my own, which you can find plans for below, but is similar to other designs you will see. In total you will need 5 sheets of plywood to complete the bed. I skipped over the shelf build in the video as I would like to make a dedicated video for that later but you will need QTY 3 3/4" sheets and QTY 2 1/4" sheets of plywood to make the additional shelves on either side of the bed.
****Murphy Bed Downloadable PDF plans:
FULL SIZE
http://www.diytyler.com/shop/murphy-bed-full/
QUEEN SIZE
http://www.diytyler.com/shop/cheap-hardware-murphy-bed-queen/
👕👕👕👕👕👕👕👕👕👕👕👕👕👕👕👕👕👕👕👕👕👕👕👕👕👕👕👕👕👕👕
Get your Shirt on!! http://bit.ly/DITylerMERCH
👕👕👕👕👕👕👕👕👕👕👕👕👕👕👕👕👕👕👕👕👕👕👕👕👕👕👕👕👕👕👕
Swivel Brackets: http://amzn.to/2DMucrf ( If they are unavailable just know that these were 6.3x6.3". Center your brackets in the same position called out in the plans and you will be fine.)
Large Roll of Edge Banding:
http://amzn.to/2GxzcSm
Edge Banding Nippers:
http://amzn.to/2DNHQtY
Support this videos sponsors:
Purebond Plywood: http://purebondplywood.com/
Fuji Spray Systems: http://www.fujispray.com/
RIDGID Power Tools
https://www.ridgid.com/powertools/promotions/
Some Tools I Used (affiliate Links):
FastCap 16oz Glue Bot: http://goo.gl/X5aNZ0
EDC Belt Carry: http://goo.gl/XZnWRx
Mirka 6" ROS Sander: https://goo.gl/Dp85kf
Fuji Q5 5 Stage Turbine Spray System: https://goo.gl/ZAJF5g
Brayer Roller: http://goo.gl/bc5uIE
3M Respirator: https://goo.gl/ZexRQd
3M Respirator Filters: https://goo.gl/92Ejh0
Ear Plugs: https://goo.gl/R937J7
RIDGID Stealth Force Impact Driver: https://goo.gl/K2jKgG
RIDGID Cordless Nailer: https://goo.gl/hFfGQw
RIDGID 18V Cordless JobMax: https://goo.gl/pvEMmf
GF High Performance Top Coat: http://amzn.to/2E2iwE3
11
views

Wood and Resin LED Seascape Lamp
As some of you might know I play engineer for my day job and it can be terribly exiting looking at gray cubical walls all day long, especially when you know the wintry outside is not any better. This winter I want to spice up my workspace cubical and bring a little bit of what I love to do at home into work with me.
This is a decorative LED lamp made from a chunk of rotted wood cast in resin epoxy to look like a seascape or mountain view. I cast the epoxy without removing all the bubbles with the hope that it would look like water and diffuse the light from the color changing LED strip that is hidden inside the molding.
The wood is a chunk of cherry wood what was starting to rot and was quite soft in some areas but these also carried the most character so I wanted to use it to display the beautiful figure. I used Minwax wood hardener to harden the rotted areas. This stuff smells like a very diluted CA clue so I think it is literally gluing the wood back together again.
After everything was stabilized I flattened the mini wood slab using a router sled. Then built a form using melamine and hot glue to form the epoxy when it was pored. I needed three pours for the epoxy per the manufacturer recommendation. The LEDs are a color changing strip that I got from amazon and mounted in some molding in which I channeled a groove to cover the strip and the controller.
The light turned out beautiful and quite a few people have asked me about it and how it was made. It is not for casting light in a dark area but for accenting a location and bringing some cheer to the atmosphere!
Check out SawBlade.com for all your wood and metal cutting needs:
https://www.SawBlade.com
Big thanks to RIDGID for sponsoring our channel check out their latest power tool promotions!
https://www.ridgid.com/powertools/promotions/
Some tools I used (affiliate links):
Flattening Router Bit: http://amzn.to/2EUidIf
LED Strip: http://amzn.to/2DumoNN
Epoxy: http://amzn.to/2FUxr15
Minwax Wood Hardener: http://amzn.to/2FSDEdO
FastCap 16oz Glue Bot: http://goo.gl/X5aNZ0
General Finishes Arm R Seal: https://goo.gl/Hkamo8
3M Respirator: https://goo.gl/ZexRQd
3M Respirator Filters: https://goo.gl/92Ejh0
Ear Plugs: https://goo.gl/R937J7
FastCap Tape Measure: http://goo.gl/t2lWJD
EDC Belt Carry: http://goo.gl/XZnWRx
RevMarkers: https://goo.gl/UJZfnq
Mirka 6" ROS Sander: https://goo.gl/Dp85kf
23
views
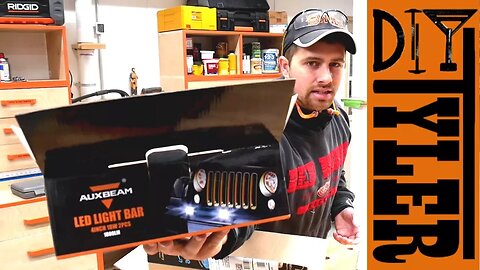
D2D DIY | I Can SEE! Adding High Power LED Reverse Lights to my Silverado
As I mature (aka get older) my night vision is degrading and once I got my Chevy pickup truck it was very difficult to see behind the truck while in reverse. Knowing that I had a 7 pin trailer plug on the Silverado I knew that I had easy access to the reverse lights power.
A quick Amazon search resulted in some low cost HIGHLY reviewed LED light bars with a multitude of options. I chose a flood light LED pair for about twenty dollars and got some accessories while I was at it.
I fabricated a custom metal bracket to hold the LED lights and welded it using my Lincoln 210MP onto the trailer bar of the truck. I chose this location as the trailer ball attachment is lower then the lights offering some protection from any parking bumps, toys or shrubs that might get hit.
I tapped into the reverse and ground wires of the trailer hitch plug and attached my LEDs. NOTE: the red wire on the LED light bar is the positive (polarity is important.) Originally I wanted to make the wire termination with some Wago connectors sealed with silicone but ran into some issues. The wago connectors were supposed to be able to accept stranded wire but the wire from the LED bars was not able to push through the spring terminal so I resorted to wire nuts. I wanted to seal everything with silicone but for some strange reason the LED lights would not work when I sealed the wire nuts, anyone have any theories let me know in the comments! In the end I simply wire nutted and sealed everything with electrical tape. Easy enough to add a few water tight connectors later if I need to, it has held up for a few months of NASTY weather already.
Big thanks to RIDGID for sponsoring our channel check out their latest power tool promotions!
https://www.ridgid.com/powertools/promotions/
LED Light Bar: http://amzn.to/2Ft6f9D
Wago Connectors: http://amzn.to/2ECyUrF
Will use these if I run into moisture issues later on:
http://amzn.to/2CWtQO4
Other Tools I Used: (affiliate Links)
EDC Belt Carry: http://goo.gl/XZnWRx
RevMarkers: https://goo.gl/UJZfnq
Swanson Combination Square: http://goo.gl/EYuGAn
Ear Plugs: https://goo.gl/R937J7
RIDGID Cordless Angle Grinder: https://goo.gl/807O2y
RIDGID 18V Hybrid LED Light Panels: https://goo.gl/w9eAkH
10
views
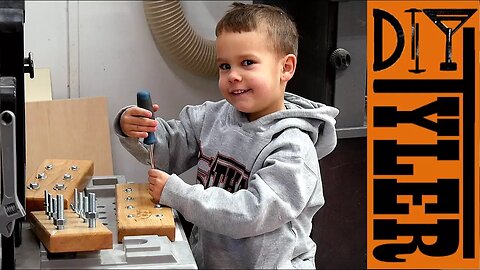
Woodworking Skill Builder Games for Children | How to Make
As many of you know my kids are out in the workshop with me almost all the time. Ethan, #DIYEthan, is out with me the most and he is always hammering, driving screws or gluing something together. For one of his Christmas gifts I decided to make him a finger dexterity game that doubles as woodworking for him to play while he is in the shop with me.
These three fine motor skill games are made using some Ash hardwood that I had laying around and a bunch of nuts and bolts laid out in a pattern to help him, or any other kids, to gain some finger strength and coordination. One game uses some carriage bolts, tee nuts and regular hex nuts to allow the children to spin the nuts with their hand. Another activity uses some t-inserts and different size screws to teach the kids to use a screwdriver properly. The last game uses some more t-inserts and hex bolts to teach kids to use a box or adjustable wrench.
I understand that not everyone is blessed to have a shop full of fancy power tools but this project can easily be made with a cheap pine 2x4, a hand saw and a drill if that is all you have. The effort of making these games for your kids or family members will be well worth it.
NOTE: Not all kids are the same, make sure the person you are building this for is old enough for such a toy.**
Check out SawBlade.com for all your wood and metal cutting needs:
https://www.SawBlade.com
Big thanks to RIDGID for sponsoring our channel check out their latest power tool promotions!
https://www.ridgid.com/powertools/promotions/
Some Tools I used (Affiliate Links):
EDC Belt Carry: http://goo.gl/XZnWRx
FastCap 16oz Glue Bot: http://goo.gl/X5aNZ0
FastCap Tape Measure: http://goo.gl/t2lWJD
RevMarkers: https://goo.gl/UJZfnq
Mirka 6" ROS Sander: https://goo.gl/Dp85kf\
Brayer Roller: http://goo.gl/bc5uIE
3M Respirator: https://goo.gl/ZexRQd
3M Respirator Filters: https://goo.gl/92Ejh0
Ear Plugs: https://goo.gl/R937J7
5
views

House Chores / Shop Maintenance / Organization with T-Rex | D2D DIY
CHECK THE COMMENTS TO WIN SOME DUCT TAPE!
House chores and home maintenance are things that we often dread doing but must be done to keep up the quality of your home. Follow me around on this Day to Day DIY video as I complete some house and shop chores with the help of some T-Rex tape.
Yes, T-Rex is paying me to make this video but you guys know that I only use and put items in these videos that I am totally behind and believe in. I only put item sin my truck that I REALLY believe in and this stuff made it in there!
Big thanks to T-Rex tape for sponsoring this video. It is companies like this that shoulder the cost of making these videos and keep the videos 100% free for you guys!
http://www.trextape.com/
Custom Barn Door Hardware
You can find all different types of barn door hardware on the market already; from Double Sliding barn door, Single sliding barn door and double bypass barn door hardware and it comes in all colors and sizes. BUT I was not able to find a double bypass set of hardware that got the doors real close together to save on room and so that you could not see through the gap of the double wooden barn doors.
Solution was to fabricate my own DIY barn door hardware. I used some 1 3/4", 2" flat bar stock, 2" square tubing and a 5-" section of mid steel channel as the bar system. Welded the brackets to allow the assembly to stand off from the wall and the roller brackets that attach the garage door rollers to the barn doors.
This was my first welding project and boy what a good time! More of that to come!
DIY BARN DOOR BUILD:
https://youtu.be/VpQsVdBc8Jo
Check out SawBlade.com for all your wood and metal cutting needs!
https://www.SawBlade.com
Big thanks to RIDGID for sponsoring our channel check out their latest power tool promotions!
https://www.ridgid.com/powertools/promotions/
11
views
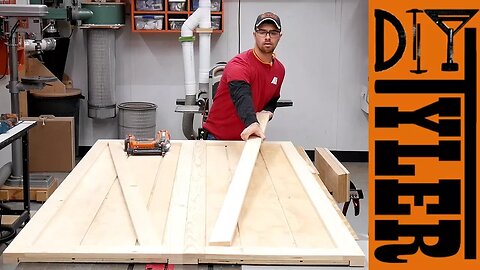
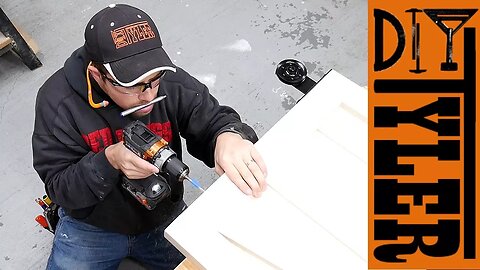
DIY Barn Door
It has been a long time coming but we have finally built our double bypass sliding barn doors for our pantry! These barn doors are built from T111 and solid pine and sport some DIY custom barn door hardware. The fabrication of the custom bypass barn door hardware will be in a following video.
👕👕👕👕👕👕👕👕👕👕👕👕👕👕👕👕👕👕👕👕👕👕👕👕👕👕👕👕👕👕👕
Get your Shirt on!! http://bit.ly/DITylerMERCH
👕👕👕👕👕👕👕👕👕👕👕👕👕👕👕👕👕👕👕👕👕👕👕👕👕👕👕👕👕👕👕
In this video I cover the build of the barn door and the installation. I skipped the fabrication of the hardware as there a TONS of options for ready to go barn door kits available online or at your local home centers.
Barn doors are a great way to enclose an area without having to sacrifice a large radius of space to allow a swinging door to move. And they look great!
Big thanks to RIDGID for sponsoring our channel check out their latest power tool promotions!
https://www.ridgid.com/powertools/promotions/
Some Tools I used (Aff Linke):
FastCap 16oz Glue Bot: http://goo.gl/X5aNZ0
FastCap Tape Measure: http://goo.gl/t2lWJD
EDC Belt Carry: http://goo.gl/XZnWRx
RevMarkers: https://goo.gl/UJZfnq
Mirka 6" ROS Sander: https://goo.gl/Dp85kf
Fuji Q5 5 Stage Turbine Spray System: https://goo.gl/ZAJF5g
3M Respirator: https://goo.gl/ZexRQd
3M Respirator Filters: https://goo.gl/92Ejh0
Ear Plugs: https://goo.gl/R937J7
RIDGID Stealth Force Impact Driver: https://goo.gl/K2jKgG
RIDGID Cordless Nailer: https://goo.gl/hFfGQw
RIDGID Cordless Angle Grinder: https://goo.gl/807O2y
24
views

Mini Drill Rack Build and GIVEAWAY | D2D DIY
GIVEAWAY closed. 22K entries THANKS GUYS! Winner announced on my Instagram page @DIYTylerG.
If you want to buy this Limited Edition Combo Kit
https://goo.gl/G6NoF5
IF YOU WANT TO WIN THIS LIMITED EDITION COMBO KIT!!!
https://www.diytyler.com/DnQTZ
RIDGID was kind enough to hook me up with one of their BLACKED OUT limited edition combo kits and it completely filled out my current drill, charging station. My solution was to use some scrap plywood to make a miniature drill rack that will hold my 12V tools and store some of the extra 18V batteries.
Big thanks to RIDGID for sponsoring our channel check out their latest power tool promotions!
https://www.ridgid.com/powertools/promotions/
1
view